In my previous post, I showed how to use JavaFX with the Raspberry Pi 3. I promised there to follow up with a post on using Spring Boot with JavaFX, so here it goes.
Just as an example, I will be using the REST API service of the Open AQ Platform API as it is simple and does not require any authentication to get started.
Initial Setup
We will be using Maven, so we start with a minimal pom.xml that includes the latest Spring Boot version (1.5.7 at the time of writing):
<?xml version="1.0" encoding="UTF-8"?>

<project xmlns="http://maven.apache.org/POM/4.0.0" xmlns:xsi="http://www.w3.org/2001/XMLSchema-instance"

xsi:schemaLocation="http://maven.apache.org/POM/4.0.0 http://maven.apache.org/xsd/maven-4.0.0.xsd">

<modelVersion>4.0.0</modelVersion>

<groupId>org.deblauwe</groupId>

<artifactId>airquality-fx</artifactId>

<version>0.0.1-SNAPSHOT</version>

<packaging>jar</packaging>

<name>AirQualityFX</name>

<description>JavaFX Client for the Open AQ Platform API</description>

<parent>

<groupId>org.springframework.boot</groupId>

<artifactId>spring-boot-starter-parent</artifactId>

<version>1.5.7.RELEASE</version>

<relativePath/> <!-- lookup parent from repository -->

</parent>

<properties>

<project.build.sourceEncoding>UTF-8</project.build.sourceEncoding>

<project.reporting.outputEncoding>UTF-8</project.reporting.outputEncoding>

<java.version>1.8</java.version>

</properties>

<dependencies>

<dependency>

<groupId>org.springframework.boot</groupId>

<artifactId>spring-boot-starter</artifactId>

</dependency>

</dependencies>

<build>

<plugins>

<plugin>

<groupId>org.springframework.boot</groupId>

<artifactId>spring-boot-maven-plugin</artifactId>

</plugin>

</plugins>

</build>

</project>
Our minimal JavaFX application will have 1 FXML file that defines the user interface and 1 Java file to get the application running. This is main.fxml:
<?xml version="1.0" encoding="UTF-8"?>

<?import javafx.scene.control.Label?>

<?import javafx.scene.layout.AnchorPane?>

<AnchorPane xmlns="http://javafx.com/javafx">

<Label text="Main Content"/>

</AnchorPane>
And this is AirQualityFxApplication.java:
package org.deblauwe.airqualityfx;

import javafx.application.Application;

import javafx.fxml.FXMLLoader;

import javafx.geometry.Rectangle2D;

import javafx.scene.Parent;

import javafx.scene.Scene;

import javafx.stage.Screen;

import javafx.stage.Stage;

import org.springframework.boot.autoconfigure.SpringBootApplication;

import org.springframework.boot.builder.SpringApplicationBuilder;

import org.springframework.context.ConfigurableApplicationContext;

@SpringBootApplication

public class AirQualityFxApplication extends Application {

private ConfigurableApplicationContext context;

private Parent rootNode;

@Override

public void init() throws Exception {

SpringApplicationBuilder builder = new SpringApplicationBuilder(AirQualityFxApplication.class);

context = builder.run(getParameters().getRaw().toArray(new String[0]));

FXMLLoader loader = new FXMLLoader(getClass().getResource("main.fxml"));

loader.setControllerFactory(context::getBean);

rootNode = loader.load();

}

@Override

public void start(Stage primaryStage) throws Exception {

Rectangle2D visualBounds = Screen.getPrimary().getVisualBounds();

double width = visualBounds.getWidth();

double height = visualBounds.getHeight();

primaryStage.setScene(new Scene(rootNode, width, height));

primaryStage.centerOnScreen();

primaryStage.show();

}

@Override

public void stop() throws Exception {

context.close();

}

}
Some things to note:
-
The class is annotated with
@SpringBootApplicationto enable Spring Boot -
We create the Spring ApplicationContext in the
init()method -
We instruct the
FXMLLoaderto use thecontext::getBeanmethod to load controllers. This will allow us to have Spring create the controllers using component scanning and inject them into our FXML files.
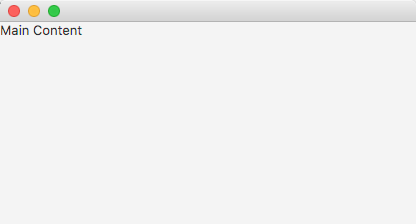
Starting the application from IntelliJ IDEA shows the UI:
Injecting a Spring instantiated service
We have started our JavaFX application using Spring Boot, but there was no gain from it for that simple application. To make things more interesting, we will add a combobox that allows to select a country. For this, we adjust main.fxml:
<AnchorPane xmlns="http://javafx.com/javafx"

xmlns:fx="http://javafx.com/fxml"

fx:controller="org.deblauwe.airqualityfx.MainController"

>

<HBox>

<Label text="Country:"/>

<ComboBox fx:id="countriesComboBox"/>

</HBox>

</AnchorPane>
Since we now want to have some functionality in our UI, we link the FXML file to a controller called MainController:
@Component

public class MainController {

@FXML

public ComboBox<Country> countriesComboBox;

@Autowired

private CountryService countryService;

@FXML

public void initialize() {

countriesComboBox.setConverter(new CountryNameStringConverter());

countriesComboBox.setItems(FXCollections.observableArrayList(countryService.getAllCountries()));

}

private static class CountryNameStringConverter extends StringConverter<Country> {

@Override

public String toString(Country object) {

return object.getName();

}

@Override

public Country fromString(String string) {

return null;

}

}

}
Not that much code, but quite some things are going on:
-
The class is annotated with
@Componentso that Spring will create a singleton out of it using component scanning -
We can access our combo box through the
countriesComboBoxfield (annotated with@FXML). Note that the name of the field should match with thefx:idgiven in the FXML file. -
We @Autowire the CountryService, which is an interface for retrieving countries. Note how this is exactly as you autowire other dependencies in a normal Spring application.
To make this fully work, we need our Country model class (using Lombok):
@AllArgsConstructor

@Getter

public class Country {

private String code;

private String name;

}
The CountryService interface:
public interface CountryService {

Set<Country> getAllCountries();

}
And our implementation:
@Component

public class HardcodedListCountryService implements CountryService {

@Override

public Set<Country> getAllCountries() {

Set<Country> result = new HashSet<>();

result.add(new Country("AU", "Australia"));

result.add(new Country("BR", "Brazil"));

result.add(new Country("BE", "Belgium"));

return result;

}

}
Since this is our only instance of CountryService, we can just have it pick up by component scanning.
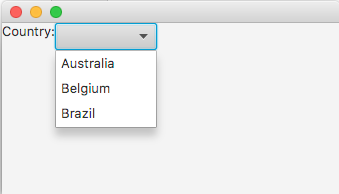
The resulting UI looks like this:
Conclusion
This post showed how to set up a real simple JavaFX project using Maven and Spring Boot. It also showed how to inject a Spring singleton into your JavaFX Controller. In a next post, I will show how to implement the actual call to the Open AQ Platform API.
This know-how originated during the development of a PegusApps project.