
{
  "name": "thymeleaf-with-tailwind-css",
  "scripts": {
    "watch": "gulp watch",
    "build": "gulp build",
    "build-prod": "gulp build --env production"
  }
}Using Tailwind CSS with Spring Boot and Thymeleaf

Interested in learning more about Thymeleaf? Check out my book
Taming Thymeleaf.
The book combines all of my Thymeleaf knowledge into an easy to follow step-by-step guide.
Tailwind CSS is an interesting utility-first CSS framework for rapidly building custom designs. It is perfectly possible to use this in a Java Spring MVC application that uses Thymeleaf for server-side rendering.
Spring Boot project setup
| If you haven’t read Spring Boot and Thymeleaf with CSS JavaScript processing using Gulp yet, you might want to do that first, since this blog post builds upon what we did there. |
By far the easiest way to start your Spring project is going to https://start.spring.io and generate a project. Select Spring Web and Thymeleaf dependencies. Unzip the generated project and open it in your favorite IDE.
Now we setup Gulp for live reloading:
-
Create a
package.jsonfile in the root of the project: -
Install Gulp, Babel and browser-sync:
npm install --save-dev gulp gulp-watch browser-sync gulp-babel \ @babel/core @babel/preset-env \ gulp-terser gulp-uglifycss gulp-environments -
Update the Maven
pom.xmlto use thefrontend-maven-plugin:<?xml version="1.0" encoding="UTF-8"?> <project xmlns="http://maven.apache.org/POM/4.0.0" xmlns:xsi="http://www.w3.org/2001/XMLSchema-instance" xsi:schemaLocation="http://maven.apache.org/POM/4.0.0 https://maven.apache.org/xsd/maven-4.0.0.xsd"> <modelVersion>4.0.0</modelVersion> <parent> <groupId>org.springframework.boot</groupId> <artifactId>spring-boot-starter-parent</artifactId> <version>2.2.4.RELEASE</version> <relativePath/> <!-- lookup parent from repository --> </parent> <groupId>com.wimdeblauwe.examples</groupId> <artifactId>thymeleaf-with-tailwind-css</artifactId> <version>0.0.1-SNAPSHOT</version> <name>thymeleaf-with-tailwind-css</name> <description>Thymeleaf with Tailwind CSS</description> <properties> <java.version>11</java.version> <frontend-maven-plugin.version>1.8.0</frontend-maven-plugin.version> <frontend-maven-plugin.nodeVersion>v12.10.0</frontend-maven-plugin.nodeVersion> <frontend-maven-plugin.npmVersion>6.10.3</frontend-maven-plugin.npmVersion> </properties> <dependencies> <dependency> <groupId>org.springframework.boot</groupId> <artifactId>spring-boot-starter-thymeleaf</artifactId> </dependency> <dependency> <groupId>org.springframework.boot</groupId> <artifactId>spring-boot-starter-web</artifactId> </dependency> <dependency> <groupId>org.springframework.boot</groupId> <artifactId>spring-boot-starter-test</artifactId> <scope>test</scope> </dependency> </dependencies> <build> <resources> <resource> <directory>src/main/resources</directory> <excludes> <exclude>**/*.html</exclude> <exclude>**/*.css</exclude> <exclude>**/*.js</exclude> </excludes> </resource> </resources> <pluginManagement> <plugins> <plugin> <groupId>com.github.eirslett</groupId> <artifactId>frontend-maven-plugin</artifactId> <version>${frontend-maven-plugin.version}</version> <executions> <execution> <id>install-frontend-tooling</id> <goals> <goal>install-node-and-npm</goal> </goals> <configuration> <nodeVersion>${frontend-maven-plugin.nodeVersion}</nodeVersion> <npmVersion>${frontend-maven-plugin.npmVersion}</npmVersion> </configuration> </execution> <execution> <id>run-gulp-build</id> <goals> <goal>gulp</goal> </goals> <configuration> <arguments>build</arguments> </configuration> </execution> </executions> </plugin> </plugins> </pluginManagement> <plugins> <plugin> <groupId>org.springframework.boot</groupId> <artifactId>spring-boot-maven-plugin</artifactId> </plugin> <plugin> <groupId>com.github.eirslett</groupId> <artifactId>frontend-maven-plugin</artifactId> </plugin> </plugins> </build> <profiles> <profile> <id>release</id> <build> <plugins> <plugin> <groupId>com.github.eirslett</groupId> <artifactId>frontend-maven-plugin</artifactId> <executions> <execution> <id>run-gulp-build</id> <goals> <goal>gulp</goal> </goals> <configuration> <arguments>build --env production</arguments> </configuration> </execution> </executions> </plugin> </plugins> </build> </profile> </profiles> </project>
As an example HTML page, create index.html at src/main/resources/templates:
<!DOCTYPE html>
<html xmlns="http://www.w3.org/1999/xhtml"
      xmlns:th="http://www.thymeleaf.org" lang="en">
<head>
    <title>TODO list</title>
</head>
<body>
<h1>TODO list</h1>
<div>
    <th:block th:if="${todos.size() > 0}">
        <ul id="todo-items-list">
            <li th:each="item : ${todos}" th:text="${item.description}">
            </li>
        </ul>
    </th:block>
    <th:block th:if="${todos.empty}">
        <div id="empty-todos-message">There are no todo items</div>
    </th:block>
</div>
</body>
</html>
In order to show our page, we need a controller:
@Controller
@RequestMapping("/")
public class TodoController {
    @GetMapping
    public String list(Model model) {
        model.addAttribute("todos", List.of(new Todo("Install Tailwind CSS"),
                                            new Todo("Make awesome UI")));
        return "index";
    }
}
An our Todo class that is used in the controller:
public class Todo {
    private final String description;

    public Todo(String description) {
        this.description = description;
    }

    public String getDescription() {
        return description;
    }
}
Finally, we also create an application-live.properties file in src/main/resources.
This disables the thymeleaf caching so changes to our HTML can be live reloaded while we are editing.
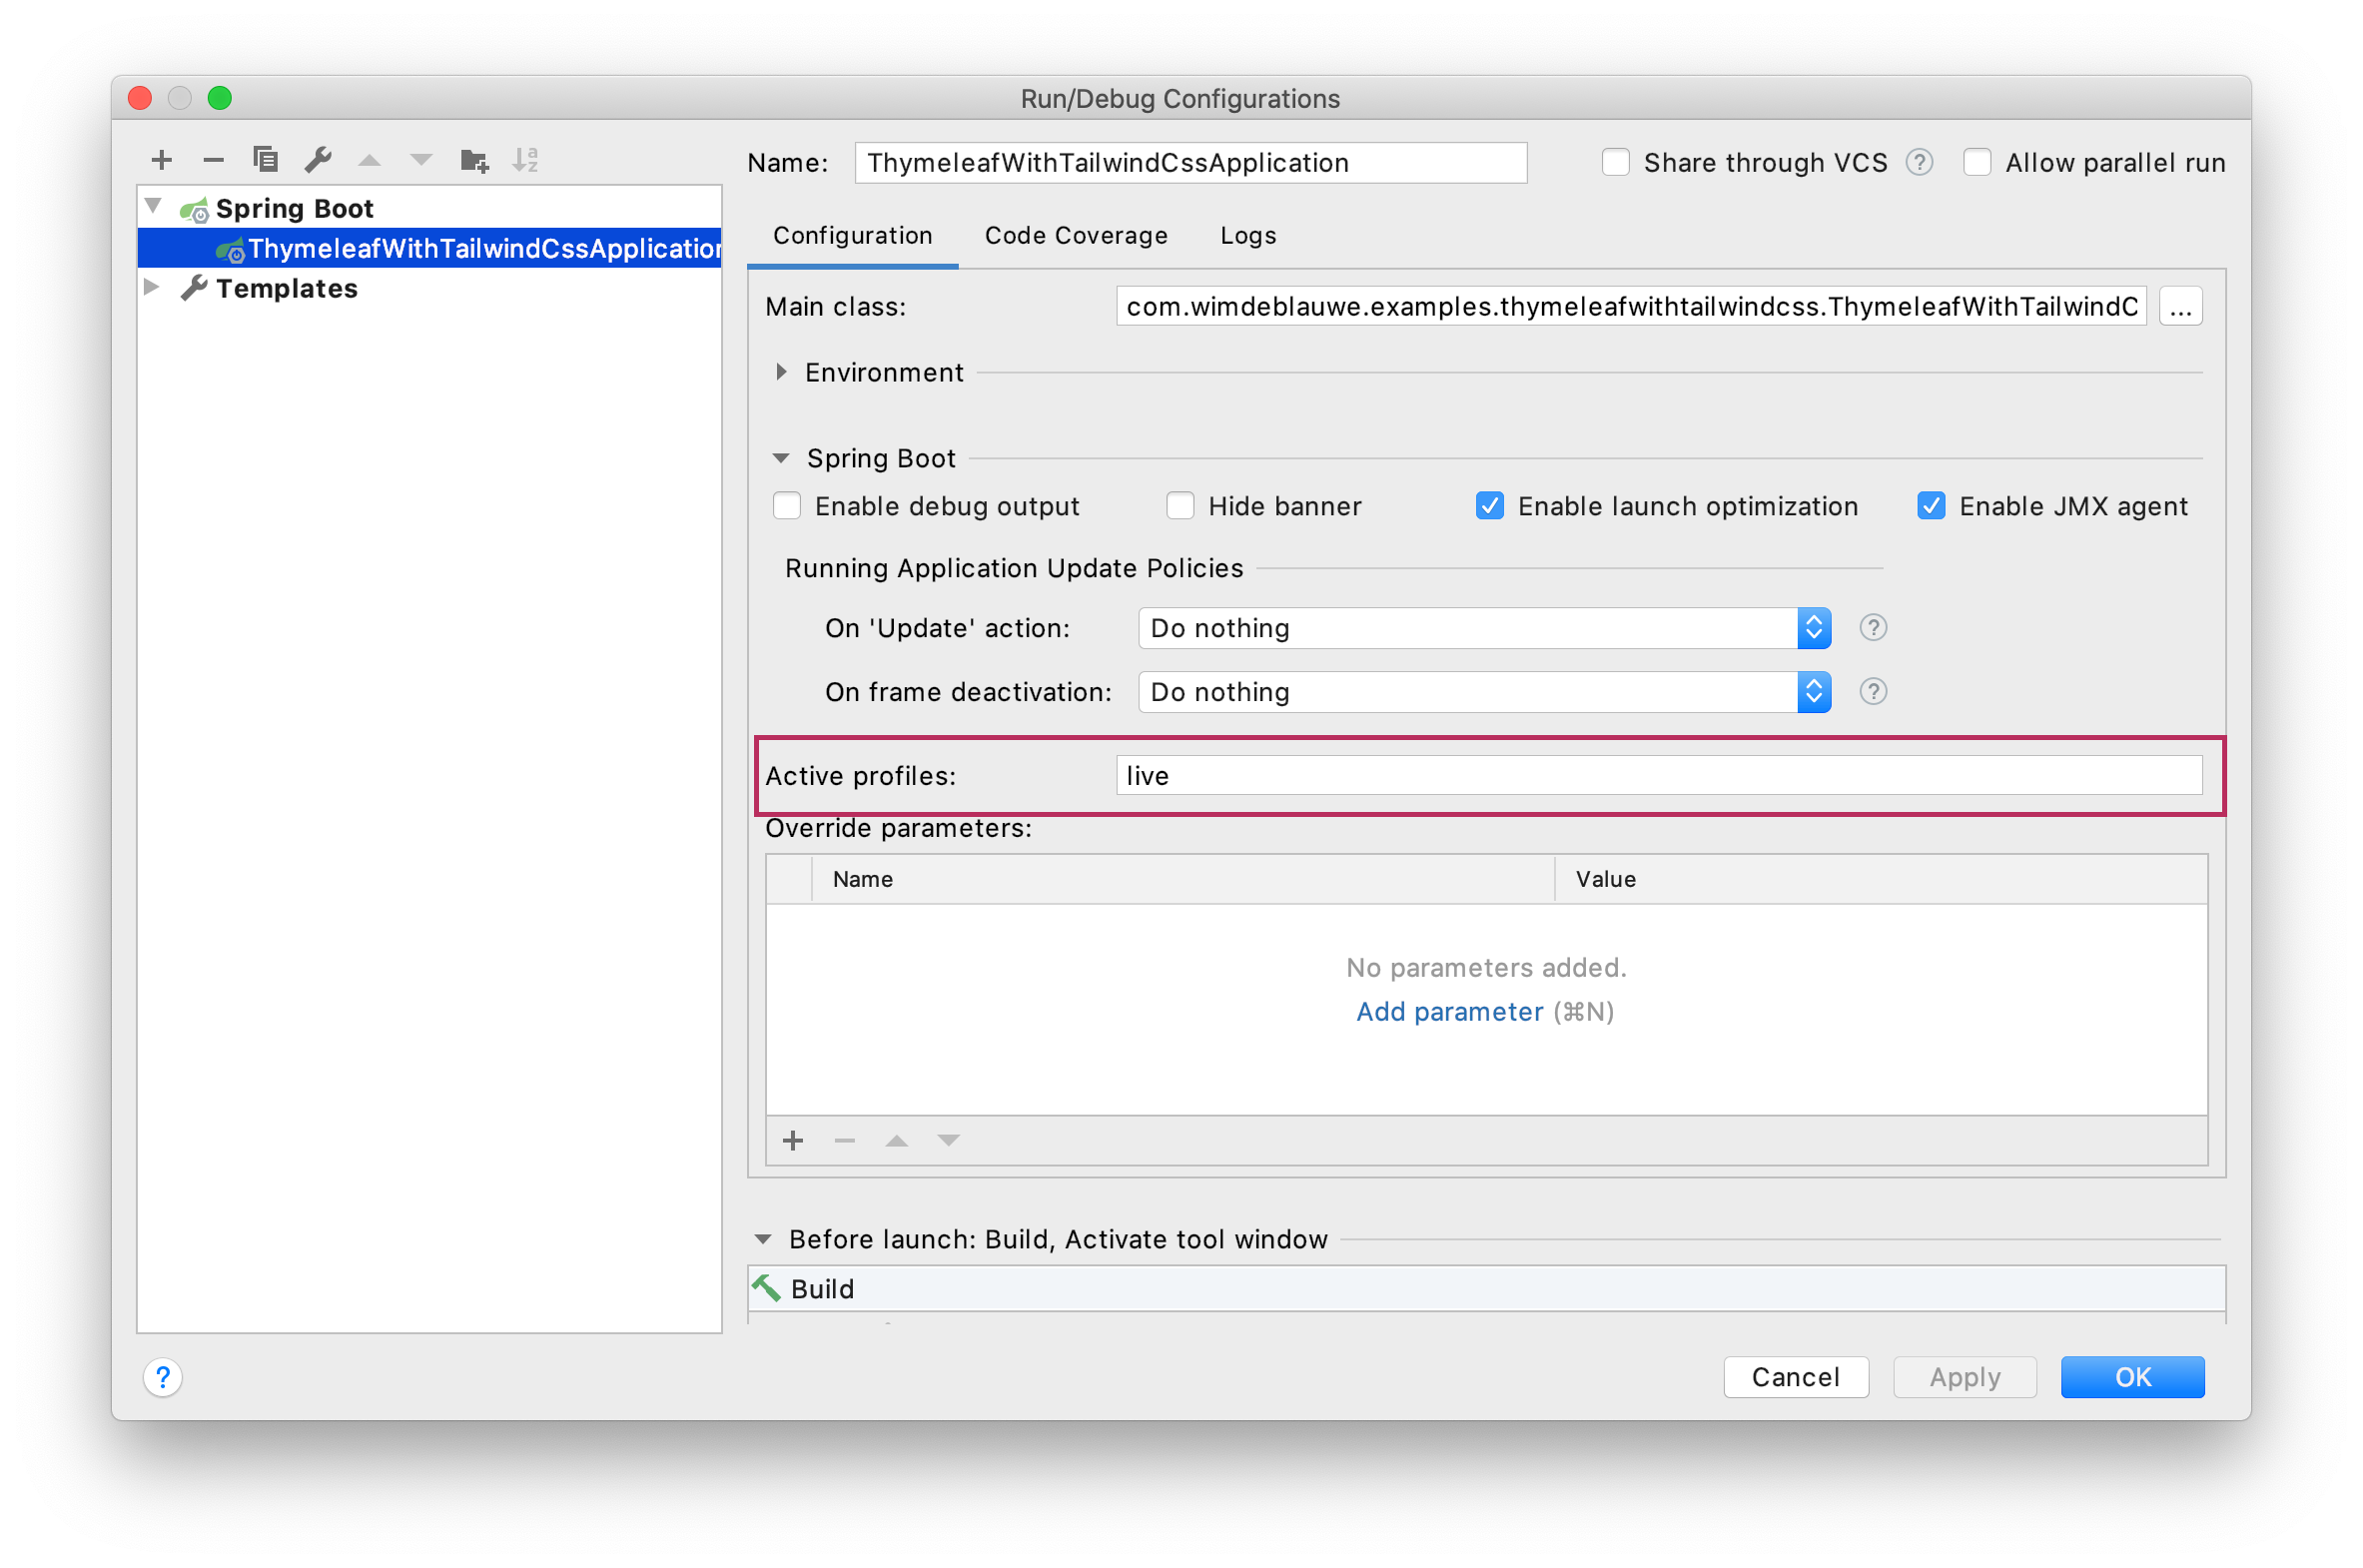
spring.thymeleaf.cache=falseNow start the Spring Boot application using the live profile. In IntelliJ, you can set this in the run configuration:
Next, open a terminal and run:
npm run build
npm run watch
This will automatically open your default browser at http://localhost:3000
This should look something like this:
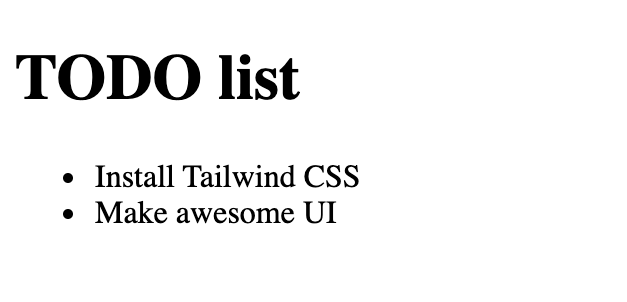
This is just the default browser styling of our HTML.
You can now also check to be sure the live reloading works by editing the <h1> title for example to something else.
When you save the file change, the browser should reload and show the change.
Adding Tailwind CSS
We will now add Tailwind CSS to our project.
-
Install tailwind CSS:
npm install tailwindcss -
Add
application.cssin thesrc/main/resources/static/cssdirectory:@tailwind base; @tailwind components; @tailwind utilities;
As a next step, we need to instruct Gulp to process those @tailwind directives in the CSS, so the output is something the browser will understand.
We use PostCSS for that.
-
Install gulp-postcss:
npm install --save-dev gulp-postcss -
Update the
copy-csstask ingulpfile.jsto use postcss:// add this line at the top of the file const postcss = require('gulp-postcss'); ... gulp.task('copy-css', () => gulp.src(['src/main/resources/**/*.css']) .pipe(postcss([ require('tailwindcss'), require('autoprefixer'), ])) .pipe(production(uglifycss())) .pipe(gulp.dest('target/classes/')) ); -
Finally, add a link to
application.cssin theindex.htmlThymeleaf template:<head> <link rel="stylesheet" href="/css/application.css"/> <title>TODO list</title> </head>
Now check if everything is ok:
-
Run
npm run build -
Start the Java app in IntelliJ (using the
liveprofile) -
Run
npm run watch
The result should look like this:

This looks a lot worse than before we applied Tailwind CSS, but no worries, it will look better soon.
Using Tailwind CSS
If you now add the Tailwind CSS classes, you will see that the HTML gets styled.
If we change our index.html to this for example:
<!DOCTYPE html>
<html xmlns="http://www.w3.org/1999/xhtml"
xmlns:th="http://www.thymeleaf.org" lang="en">
<head>
    <link rel="stylesheet" href="/css/application.css"/>
    <title>TODO list</title>
</head>
<body>
<div class="bg-white overflow-hidden border-t border-l border-r border-gray-400 p-4 px-3 py-10 bg-gray-200 flex justify-center">
<div class="w-full max-w-xs">
<div class="bg-white shadow-md rounded px-8 pt-6 pb-8 mb-4">
<h1 class="text-2xl text-gray-500 mb-3">TODO list</h1>
<th:block th:if="${todos.size() > 0}">
<ul id="todo-items-list" class="list-disc pl-6">
<li th:each="item : ${todos}" th:text="${item.description}" class="my-2">
</li>
</ul>
</th:block>
<th:block th:if="${todos.empty}">
<div id="empty-todos-message">There are no todo items</div>
</th:block>
</div>
</div>
</div>
</body>
</html>Then we get this result:

Purging unneeded CSS classes
If you look at the generated application.css, then you’ll see that it is quite big since it contains all possible utility classes.
Since we only use a few, we should remove the unused ones if we build for production.
We will use purgecss for this:
-
First, install purgecss:
npm install --save-dev gulp-purgecss -
Update
gulpfile.js:// add this line at the top of the file const purgecss = require('gulp-purgecss'); ... gulp.task('copy-css', () => gulp.src(['src/main/resources/**/*.css']) .pipe(postcss([ require('tailwindcss'), require('autoprefixer'), ])) .pipe(production(purgecss({ (1) content: ['src/main/resources/templates/**/*.html'] }))) .pipe(production(uglifycss())) .pipe(gulp.dest('target/classes/')) );1 Add purgecss referring to the location of our HTML templates. We also wrap this with productionso the purging only happens if we build for production
/* purgecss start ignore */ @tailwind base; @tailwind components; /* purgecss end ignore */ @tailwind utilities; |
To test this, run:
npm run build-prodThe resulting application.css in target/classes/static/css will only contain the styles that have been used in our index.html page.
Conclusion
It is perfectly possible to use Tailwind CSS in a Spring Boot project that uses Thymeleaf for server-side rendered HTML.
The full source code is available on GitHub.
If you want to be notified in the future about new articles, as well as other interesting things I'm working on, join my mailing list!
I send emails quite infrequently, and will never share your email address with anyone else.