Tailwind CSS version 2 has recently been released. This blog post shows how to add Tailwind CSS to your Hugo generated blog.
Make sure you have Hugo installed to follow along. I am using Hugo 0.79.0.
You also need to have npm installed. I am using 6.14.7.
-
Create a new Hugo site:
hugo new site my-hugo-sitemy-hugo-site can be anything you want, it will also be the directory where the files are created.
-
Change to the generated directory and create an empty
package.jsonfile to bootstrap thenpmproject:cd my-hugo-site npm initEnter the requested information, or just go with the defaults.
-
Install Tailwind CSS as an npm dependency together with the other needed dependencies:
npm install tailwindcss postcss postcss-cli autoprefixerThis should result in an update of
package.jsonto have adependenciessection like this:{ ... "dependencies": { "autoprefixer": "^10.2.1", "postcss": "^8.2.4", "postcss-cli": "^8.3.1", "tailwindcss": "^2.0.2" } } -
Create
postcss.config.jsat the root of the project with the following contents:module.exports = { plugins: { tailwindcss: {}, autoprefixer: {} } } -
Initialize the Tailwind CSS configuration file:
npx tailwindcss initThis generates a
tailwind.config.jsfile. This allows to configure and customize Tailwind CSS. -
Update the
purgeoption intailwind.config.js:module.exports = { purge: ['layouts/**/*.html'], darkMode: false, // or 'media' or 'class' theme: { extend: {}, }, variants: { extend: {}, }, plugins: [], } -
Create
assets/css/main.csswith the Tailwind CSS directives (You will need to create theassets/cssdirectory manually):@tailwind base; @tailwind components; @tailwind utilities; -
Create
layouts/_default/baseof.html:<!DOCTYPE html> <html lang="{{ .Language.Lang }}"> <head> {{ partial "head.html" . }} </head> <body> {{ block "main" . }}{{ end }} {{ partial "footer.html" . }} </body> </html> -
Create
layouts/partials/head.html:<meta http-equiv="Content-Type" content="text/html" charset="UTF-8" /> <meta http-equiv="X-UA-Compatible" content="IE=edge,chrome=1" /> <meta name="viewport" content="width=device-width, initial-scale=1.0" /> {{ $styles := resources.Get "css/main.css" | postCSS }} {{ if .Site.IsServer }} <link rel="stylesheet" href="{{ $styles.RelPermalink }}"/> {{ else }} {{ $styles := $styles | minify | fingerprint | resources.PostProcess }} <link rel="stylesheet" href="{{ $styles.RelPermalink }}" integrity="{{ $styles.Data.Integrity }}"/> {{ end }}The
.Site.IsServerflag istruewhen running the live reload server. When building for production, this isfalse. This allows to only minify and purge the CSS when building the production site. -
Create
layouts/partials/footer.html:<footer class="bg-gray-900"> <div class="flex justify-center text-white py-1">This is the footer</div> </footer> -
Create
layouts/index.html:{{ define "main" }} <main class="container mx-auto px-4 py-24 bg-gray-100"> <h1>Welcome to Hugo with Tailwind CSS</h1> <div class="text-gray-500">This is an example site with Tailwind CSS 2</div> </main> {{ end }} -
Start the Hugo live reload server:
hugo server
With all this in place, the browser should show something like this:
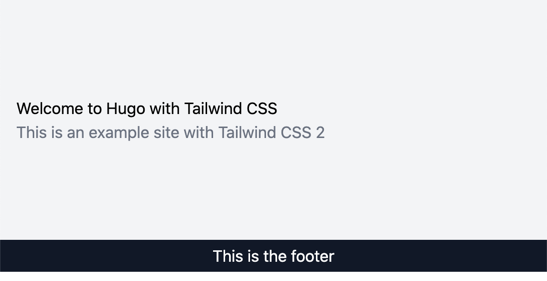
You see the website with some basic styling from the Tailwind CSS classes that have been used.
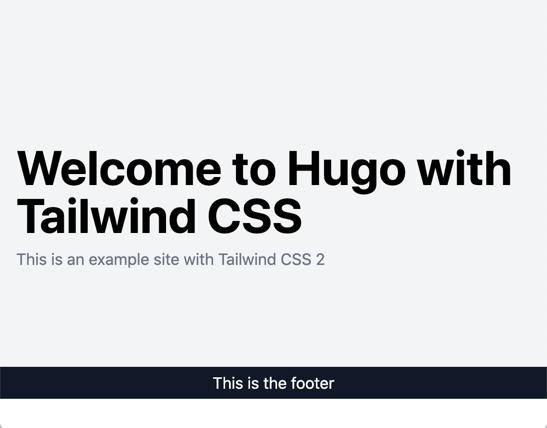
Since Tailwind CSS normalizes everything, the <h1> title will be just normal text size. We can give it a style to our liking by updating assets/css/main.css using @apply:
@tailwind base;
@tailwind components;
@tailwind utilities;
h1 {
@apply text-5xl font-bold mt-12 mb-2
}The browser should automatically refresh and show the updated title style:
To build for production, be sure to set the NODE_ENV variable:
NODE_ENV=production hugoThis will ensure only the minimum needed CSS will be generated.
I would like to thank the authors of How to Get Tailwind Integrated With a Hugo Site and rockylinux.org for the inspiration they provided to get to this setup.