
How I write production-ready Spring Boot applications
Learn how to test real-world applications with the
Testing Spring Boot Applications Masterclass.
Comprehensive online course with 8 modules and 130+ video lessons to master well-known Java testing libraries: JUnit 5, Mockito, Testcontainers, WireMock, Awaitility, Selenium, LocalStack, Selenide, and Spring's Outstanding Test Support.
This blog post will explain how I currently write Spring Boot applications. I have been writing Java for over 25 years, and most of that involved Spring and its ecosystem. I will talk about how I architect my app, package structure, naming conventions, etc.
|
If you want to jump to a particular section of this blog post, use the following links: |
Getting started
A new project gets started in 2 possible ways:
-
Spring Initializr: When I am building a REST API application, I use https://start.spring.io to generate the project.
-
ttcli: For projects using server-side rendering with Thymeleaf, I use the command line tool I purposely built for starting that type of projects.
High-level architecture
The architecture leans heavily on the Domain Driven Design concept of the Aggregate Root.
An Aggregate is the collection of domain entities that together form a consistent whole. The entity inside the aggregate that is to be considered the most important entity is called the aggregate root.
A simple example is an Order with List<OrderEntry>.
The aggregate entails the 2 entities: Order and OrderEntry.
The Order would be the aggregate root.
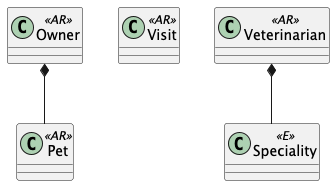
If we apply this to the well-known Petclinic example, we see the following entities:
-
Owner
-
Pet
-
Visit
-
Veterinarian
-
Speciality
Three of these entities are clearly aggregate roots: Owner, Visit and Veterinarian.
An Owner can exist independently and would typically be the entry point for managing pet ownership. A Veterinarian should also be an aggregate root. Veterinarians exist independently in the business domain and have their own lifecycle. They can practice multiple specialties and see many pets, but they’re not owned by or dependent on other entities. Visit is likely an aggregate root as well. While a Visit involves an Owner, a Pet and a Veterinarian, it represents a distinct business transaction with its own lifecycle, business rules, and consistency requirements (scheduling, billing, medical records, etc.).
For the Pet entity, things are less clear. We can consider a Pet to be a separate aggregate root or part of the Owner aggregate. Remember:
“All models are wrong, some are useful.”
— George Box
If we want to model that the Pet exists on its own, as an animal without being a Pet, we can consider the Pet an aggregate root. However, an animal is only a Pet when considered as such by an owner. For that reason, I would consider Pet to be part of the Owner aggregate.
We will also consider Speciality to be an entity within the Veterinarian aggregate.
This class diagram shows an overview:
Why do we need to know this?
Because it defines how I build my packages.
Package structure
I name my packages based on the aggregate roots of the application.
In our example, this would be:
com.company.app
  + owner
  + visit
  + veterinarian
Inside each of those packages, I place all entities of the aggregate and also any value objects that those entities use.
For example, in com.company.app.owner, I would have the following classes:
com.company.app.owner
  + OwnerId
  + Owner
  + PetId
  + Pet
  + Mass
Owner and Pet are entities, while OwnerId, PetId, and Mass are value objects. OwnerId and PetId encapsulate a UUID which is used as primary key in the database. Mass represents the pet’s weight and encapsulates either a double or int, depending on how we want to model it.
Value objects like Mass eliminate the guesswork around units.
Without them, you’re left wondering "what unit did we choose for the pet’s mass?" when you see a simple double mass property.
The alternative is awkward naming like double massInKg or double massInGrams.
The code for the Mass class could look something like this:
public record Mass(int value) {
  public Mass {
    Assert.isTrue( value > 0, "The Mass value should be a positive number" );
  }

  public static Mass ofGrams(int value) {
    return new Mass(value);
  }

  public static Mass ofKg(double value) {
    return new Mass((int)(value * 1000));
  }
}
Another advantage of the Mass value object is guaranteed validity.
You know the mass is already valid (for example, not a negative number) because the value object validates this during construction.
For each of those packages, I add the following sub-packages: repository, usecase, and web.
com.company.app.owner
  * repository
  * usecase
  * web
  + OwnerId
  + Owner
  + PetId
  + Pet
Any of those sub-packages can use the domain classes, but the domain classes cannot use any of the classes from the subpackages.
The repository package has all classes related to database interaction.
It will either use the domain classes directly when using JPA, or there will be dedicated entity objects inside the repository package in case you want to do a mapping.
If you don’t use JPA, but JdbcClient for example, then the domain objects can remain "pure" and you put all JDBC-related code inside that package.
The usecase package contains what is tradionally considered the service layer.
But instead of one big service class, I like to split things up into smaller, focused classes.
Finally, the web package will contain the controller and the Data Transfer Objects (DTO) for the JSON serialization and deserialization.
|
There is no Kafka or message queue in the example.
If there would be, I would probably add another sub-package called |
Production code
Repository implementation
If this is an application where I have full control over the database, I will usually put JPA annotations on the domain objects.
If you don’t want to do this and keep your domain "pure", then you can create extra JPA specific objects (e.g. OwnerEntity, PetEntity) in the repository package.
See Get Your Hands Dirty on Clean Architecture for more information on the various ways that you can do mapping between application layers.
In our Owner example, this would like as follows:
package com.company.app.owner.repository;

import io.github.wimdeblauwe.jpearl.AbstractEntity;
import jakarta.persistence.CascadeType;
import jakarta.persistence.Entity;
import jakarta.persistence.OneToMany;
import java.util.HashSet;

@Entity
public class Owner extends AbstractEntity<OwnerId> {

  private String name;

  @OneToMany(mappedBy = "owner", cascade = CascadeType.ALL, orphanRemoval = true)
  private Set<Pet> pets = new HashSet<>();

  protected Owner() {}

  public Owner(OwnerId id, String name, Set<Pet> pets) {
    super(id);
    this.name = name;
    for(Pet pet : pets) {
      addPet(pet);
    }
  }

  public String getName() {
    return name;
  }

  public void setName(String name) {
    this.name = name;
  }

  public void addPet(Pet pet) {
    pet.setOwner(this);
    pets.add(pet);
  }
}
With OwnerId defined as:
package com.company.app.owner.repository;

import io.github.wimdeblauwe.jpearl.AbstractEntityId;

import java.util.UUID;

public class OwnerId extends AbstractEntityId<UUID> {

  protected OwnerId() {
  }

  public OwnerId(UUID id) {
    super(id);
  }
}
The classes use the JPearl library which makes it easy to work with value objects for the primary keys (e.g. OwnerId).
The library also assumes that the primary key is passed into the constructor so you never have an object that is different depending on whether it has been saved in the database.
It makes it easier to use the object as a domain object if you are not using it as a JPA entity, and it makes the equals and hashcode implementations trivial.
The AbstractEntity class defines equals() and hashCode() by comparing the id only which is the correct way for an entity.
If you need to implement equals and hashcode yourself on your JPA entities, be sure to read How to implement equals and hashCode using the JPA entity identifier and The best way to implement equals, hashCode, and toString with JPA and Hibernate.
Because Pet is considered to be part of the Owner aggregate root, we can use the @OneToMany JPA annotation to map the full Pet objects from the Owner.
If we have references between aggregate roots, then we should link by id only!
As an example, this is how the Visit aggregate root could look like:
@Entity
public class Visit extends AbstractEntity<VisitId> {

  private VeterinarianId veterinarianId;

  private OwnerId ownerId;

  private PetId petId;

  private Instant appointmentTime;

  protected Visit() {
  }

  public Visit(VisitId id,
               VeterinarianId veterinarianId,
               OwnerId ownerId,
               PetId petId,
               Instant appointmentTime) {
    super(id);
    this.veterinarianId = veterinarianId;
    this.ownerId = ownerId;
    this.petId = petId;
    this.appointmentTime = appointmentTime;
  }

  // ....
}
There are several advantages to this:
-
The JPA mapping is simpler. You don’t need to think about
@OneToManyor@ManyToMany, do you use unidirectional or bidirectional mapping, etc… -
You avoid queries would get a large amount of data that maybe you don’t need. In this example, if we mapped the complete
Owner, we would retrieve all itsPetinstances as well while we are only interested in thePetthat is part of the visit. -
Less chance of competing updates. If you update a Veterinarian while simultaneously updating their visits, you won’t accidentally overwrite the Veterinarian changes with stale data from the Visit update.
The only drawback is that you need to do extra database calls in case you want more information from the entities that are referenced by id only. This drawback can be mitigated by using projections for example, to retrieve the id and the name if that makes sense for the use case.
Now, inside each repository package, I create the following structure:
com.company.app.owner.repository
+ OwnerRepository
+ JpaOwnerRepository
+ SpringDataJpaOwnerRepository
This three-layer approach separates concerns cleanly: the public interface OwnerRepository defines what operations are available, the implementation handles the business logic of those operations, and the Spring Data interface provides the actual database interactions.
This separation makes the code more testable and allows you to swap persistence technologies without affecting the rest of your application.
|
Only aggregate roots get repositories
Because |
The OwnerRepository is the most important interface.
It is the public part, while the other two should be considered implementation details.
package com.company.app.owner.repository;

public interface OwnerRepository {
  OwnerId nextId();

  PetId nextPetId();

  void save(Owner owner);

  Optional<Owner> findById(OwnerId id);

  Owner getById(OwnerId id);

  Page<Owner> findAll(Pageable pageable);
}
By defining our repository like this, we hide the fact that we use Spring Data JPA. This has two advantages:
-
We can freely change our persistence technology. Suppose we want to use JDBC instead of Spring Data JPA. We can just add a different implementation in the
repositorypackage and the rest of the code base would not be affected. -
We can write an in memory version of the repository which will be very convenient to write tests for our use cases. If we directly would do
OwnerRepository extends CrudRepository<Owner, OwnerId>, then we need to implement more methods than we would like to given all the methods thatCrudRepositoryhas.
What you might not recognize are the nextId and nextPetId methods.
They allow getting a primary key from the repository.
If the OwnerId for example is using a UUID internally, then this is not really needed, but it allows to be ready in case we change our minds.
We might want to use a Long taken from a database sequence, or use a Time-sorted Identifier for better performance.
By getting the id from the repository, these kind of changes are fairly easy to implement.
|
If you don’t want to use early primary key generation, but more traditional ways of having the database set the primary key on save, you can still use this architecture.
You just don’t have those |
One last thing about my repository interface is that I usually have findBy… methods that return Optional and also getBy.. methods that will throw an exception when not found.
It avoids having these duplicate orElseThrow(…) statements in my use cases.
The JpaOwnerRepository contains the implementation of the OwnerRepository interface:
import java.util.UUID;

@Repository
class JpaOwnerRepository implements OwnerRepository {

  private final SpringDataJpaOwnerRepository repository;

  public JpaOwnerRepository(SpringDataJpaOwnerRepository repository) {
    this.repository = repository;
  }

  @Override
  public OwnerId nextId() {
    return new OwnerId(UUID.randomUUID());
  }

  @Override
  public PetId nextPetId() {
    return new PetId(UUID.randomUUID());
  }

  @Override
  void save(Owner owner) {
    repository.save(owner);
  }

  @Override
  Optional<Owner> findById(OwnerId id) {
    return repository.findById(id);
  }

  @Override
  Owner getById(OwnerId id) {
    return repository.findById(id)
      .orElseThrow(new OwnerNotFoundException(id));
  }

  @Override
  Page<Owner> findAll(Pageable pageable) {
    return repository.findAll(pageable);
  }
}
As you can see, the heavy lifting is delegated to the SpringDataJpaOwnerRepository which looks like this:
interface SpringDataJpaOwnerRepository extends CrudRepository<Owner, OwnerId>, PagingAndSortingRepository<Owner, OwnerId> {

}
Let’s move up to the next layer: use cases.
Use cases
Using use cases instead of a single service class is a concept coming from Clean Architecture.
For a simple CRUD application, these would be something like:
-
CreateOwner -
UpdateOwner -
GetOwner -
DeleteOwner
We can get a bit more creative and use something like RegisterOwner or RegisterOwnerWithPet or RegisterPetToExistingOwner, but the basic idea is the same: the use case class does one action (as seen from the user’s point-of-view).
They have a single method execute.
This method can be void, or return something.
It can also have no parameters, or it can have a few.
As an example, this is the RegisterOwnerWithPet use case:
package com.company.app.owner.usecase;

@UseCase
public class RegisterOwnerWithPet {

  private final OwnerRepository repository;

  public RegisterOwnerWithPet(OwnerRepository repository) {
    this.repository = repository;
  }

  public Owner execute(RegisterOwnerWithPetParameters parameters) {
    OwnerId id = repository.nextId();
    Owner owner = new Owner(id, parameters.ownerName());

    PetId id = repository.nextPetId();
    Pet pet = new Pet(id, parameters.petName(), parameters.petWeight());

    owner.addPet(pet);

    repository.save(owner);

    return owner;
  }
}
The @UseCase annotation is a custom annotation that combines @Component with @Transactional:
import org.springframework.core.annotation.AliasFor;
import org.springframework.stereotype.Component;
import org.springframework.transaction.annotation.Transactional;

import java.lang.annotation.ElementType;
import java.lang.annotation.Retention;
import java.lang.annotation.RetentionPolicy;
import java.lang.annotation.Target;

@Target(ElementType.TYPE)
@Retention(RetentionPolicy.RUNTIME)
@Component
@Transactional
public @interface UseCase {

  @AliasFor(annotation = Transactional.class, attribute = "readOnly")
  boolean readOnly() default false;
}
The RegisterOwnerWithPetParameters is a record that has already validated all parts that it contains.
It is part of the domain and should use domain objects and/or value objects when possible.
The nice thing about this is that a use case does not need to worry if there are things in the parameters that are not valid.
Like being null if they should not.
When we get to the web layer, we will see how we do the validation there and convert to such a parameters object.
|
Command
I have seen people use |
This is the code of the RegisterOwnerWithPetParameters record:
record RegisterOwnerWithPetParameters(
    String ownerName,
    String petName,
    Mass petWeight) {
  RegisterOwnerWithPetParameters {
    Assert.hasText(ownerName, "The RegisterOwnerWithPetParameters ownerName should have text");
    Assert.hasText(petName, "The RegisterOwnerWithPetParameters petName should have text");
    Assert.notNull(petWeight, "The RegisterOwnerWithPetParameters petWeight should not be null");
  }
}
Using Spring’s Assert methods, we fail quickly in case the parts that make up the parameters are invalid.
|
One thing that comes up frequently when working with use cases is "Can/Should a use case call other use cases?". As a rule of thumb, I try to avoid this. This keeps use cases focused on a single responsibility and makes them easier to test independently. When there’s common code, I extract it into helper components instead. For example, suppose you have an application that displays sports scores.
You might have use cases like Another drawback of having use cases call other use cases is potential performance issues. If a use case queries the database for a single record and you reuse it to fetch many records, you’ll end up with an inefficient database access pattern. Using a dedicated query to retrieve all the information you need in one go can massively improve the use case’s performance. |
Now we can again go up to the next layer: the web layer.
Controllers on the web layer
Inside the web sub-package, I will put the RestController (or Controller for a Thymeleaf project) and any DTOs that are required.
I do like a DTO as a construct, but I really don’t like putting it in the name of a class as a suffix.
You also don’t use OwnerRepositoryInterface or OwnerClass as names.
Instead, I use …Request for DTOs that are used as request bodies and …Reponse for those that are used as response bodies.
Keeping up with our "register owner with pet" example, the REST controller would be something like this:
@RestController
@RequestMapping("/api/owners")
public class OwnerController {
  private final RegisterOwnerWithPet registerOwnerWithPet;
  // There would be more use cases here

  public OwnerController(RegisterOwnerWithPet registerOwnerWithPet) {
    this.registerOwnerWithPet = registerOwnerWithPet;
  }

  @PostMapping
  public OwnerResponse registerOwnerWithPet(@Valid @RequestBody RegisterOwnerWithPetRequest request) {

    RegisterOwnerWithPetParameters parameters = request.toParameters();
    Owner owner = registerOwnerWithPet.execute(parameters);

    return OwnerResponse.of(owner);
  }

  // More controller methods here
}
The RegisterOwnerWithPetRequest looks quite similar to RegisterOwnerWithPetParameters:
record RegisterOwnerWithPetRequest(
    @NotBlank String ownerName,
    @NotBlank String petName,
    @Positive int petWeight) {

  RegisterOwnerWithPetParameters toParameters() {
    return new RegisterOwnerWithPetParameters(
        ownerName,
        petName,
        Mass.ofGrams(petWeight));
  }
}
The main difference is that we use validation annotations here. This allows returning a nice error message to the caller in case there are validation issues.
By using my error-handling-spring-boot-starter library, I just need to add the dependency and I get something like this out of the box:
{
  "code": "VALIDATION_FAILED",
  "message": "Validation failed for object='request'. Error count: 2",
  "fieldErrors": [
    {
      "code": "REQUIRED_NOT_BLANK",
      "property": "ownerName",
      "message": "must not be blank",
      "rejectedValue": "",
      "path": "ownerName"
    },
    {
      "code": "REQUIRED_NOT_BLANK",
      "property": "petName",
      "message": "must not be blank",
      "rejectedValue": null,
      "path": "petName"
    }
  ]
}
If there are no validation issues, we convert the request into a parameters object and pass it to the use case.
In this example, the conversion to the RegisterOwnerWithPetParameters object is trivial, but when more value objects are used, there will be slightly more code involved.
The rule to remember is that parameter objects are defined in terms of the domain and should use all the richness like Value Objects.
The request objects are defined in terms of the JSON they represent.
For that reason, while they look similar, they are two distinct things that warrant to have their own class.
The result of the use case is converted into a response via a static factory method on OwnerResponse:
record OwnerResponse(UUID id, String ownerName, List<String> petNames) {

  static OwnerResponse of(Owner owner) {
    return new OwnerResponse(
        owner.id().value(),
        owner.name(),
        owner.pets().stream().map(Pet::name).toList()
    );
  }
}|
Something I see a lot in tutorials and also in real code is the use of a single DTO to be used as a request body for creating and updating something, and also use that as a response object.
This is not a good idea as most of the time, you don’t have exactly the same fields used in those 3 cases.
By using |
In the OwnerResponse, I use basic Java classes which serialize easily.
This usually means unwrapping value objects like calling the value() method on OwnerId().
Infrastructure code
What about the code that is not relevant to a single aggregate root, but rather is setup to the complete application?
For that code, I always have an infrastructure package at the level of the aggregate root packages:
com.company.app
  + infrastructure
  + owner
  + visit
  + veterinarian
Some typical layout of the infrastructure package would be this:
com.company.app.infrastructure
  + security
    + WebSecurityConfiguration --> Spring Security configuration
  + stereotype
    + UseCase
  + util
    + ObjectUtils --> Some helper methods.
  + web
+ WebMvcConfiguration|
One helper method I like to add to my It allows to use this: Alternativly, you can use |
Why Not Hexagonal Architecture?
You might be wondering why I don’t use Hexagonal Architecture (also known as Ports and Adapters), especially since my approach shares some similarities with its layered structure.
While Hexagonal Architecture is a solid architectural pattern, I find it introduces more ceremony than necessary for most Spring Boot applications. Here’s why I prefer the approach outlined in this post:
-
Reduced Abstraction Overhead: Hexagonal Architecture requires defining ports (interfaces) for every external dependency - databases, message queues, external APIs, etc. While this provides maximum flexibility, it often results in interfaces that have only one implementation. My approach uses abstractions where they add real value (like the repository interface) but doesn’t force abstraction everywhere.
-
Simpler Mental Model: Developers can quickly understand the three-layer structure within each aggregate (domain, use cases, infrastructure concerns). Hexagonal Architecture’s inside-out thinking and port/adapter terminology can be harder for teams to grasp and apply consistently.
-
Less Boilerplate: You don’t need to create adapter classes for every external integration. Spring’s built-in abstractions (like
@Repository,@RestController) serve as sufficient boundaries in most cases. -
Focused Domain Protection: My approach still protects the domain layer - domain objects can’t depend on infrastructure concerns. But it does so without the extensive interface definitions that Hexagonal Architecture requires.
That said, if you like Hexagonal Architecture, by all means use it. But for typical Spring Boot applications, the approach I’ve outlined provides the right balance of structure and simplicity in my opinion.
For me, it hits the sweet spot between under-architecture (everything in one layer) and over-architecture (too many abstractions) for most Spring Boot projects I’ve encountered.
Conclusion
This architectural approach has served me well across numerous Spring Boot projects over the years. By organizing code around aggregate roots and separating concerns into distinct layers, we achieve several key benefits:
-
Maintainability: Each aggregate is self-contained with clear boundaries. Changes to one aggregate rarely affect others, making the codebase easier to modify and extend.
-
Testability: The separation between domain logic, use cases, and infrastructure allows for focused unit tests. You can test business logic without databases, and test repositories without web controllers.
-
Flexibility: The abstraction layers mean you can swap out persistence technologies, change web frameworks, or add new interfaces (like message queues) without major refactoring.
-
Team Productivity: New team members can quickly understand the structure and contribute to specific aggregates without needing to grasp the entire system.
-
Domain Focus: By keeping domain objects at the center and pushing technical concerns to the edges, the code better reflects the business domain it serves.
While this approach requires more initial setup than a typical Spring Boot tutorial, the investment pays dividends as your application grows in complexity. The structure scales well from small applications to large enterprise systems.
I find that this architecture works equally well for CRUD applications as well. Even simple create, read, update, and delete operations benefit from the clear structure and separation of concerns, making them easier to maintain and extend over time.
The key is to be intentional about your architectural decisions and consistent in their application. Start with these patterns, adapt them to your specific needs, and don’t be afraid to evolve them as you learn what works best for your team and domain.
Continue reading about how I approach testing with this setup in the next post in this series: How I test production-ready Spring Boot applications
See wimdeblauwe/petclinic on GitHub for the full sources of these examples.
If you have any questions or remarks, feel free to post a comment at GitHub discussions.
A big thank you to my colleagues Musa Kapan, Mike Seghers, Gregory Sabbe, Pieter Senden and Wout Deleu for reviewing this blog post.
If you want to be notified in the future about new articles, as well as other interesting things I'm working on, join my mailing list!
I send emails quite infrequently, and will never share your email address with anyone else.