
How I document production-ready Spring Boot applications
Learn how to test real-world applications with the
Testing Spring Boot Applications Masterclass.
Comprehensive online course with 8 modules and 130+ video lessons to master well-known Java testing libraries: JUnit 5, Mockito, Testcontainers, WireMock, Awaitility, Selenium, LocalStack, Selenide, and Spring's Outstanding Test Support.
This blog post explains how I like to document a Spring Boot application I am writing. It is the third and last post in my series on writing production-ready Spring Boot applications. See How I write production-ready Spring Boot applications and How I test production-ready Spring Boot applications for the other posts in the series.
Documentation in the code
There are many ways to write documentation. You can have a shared drive with Word or Pages files. You can use online systems like Google Drive, Confluence or Notion. There are probably many other options as well.
The problem with all those is that the documentation is "somewhere else". It is not part of the code base. Some of those systems use a proprietary format that you can’t read unless you have a license for the software.
I write my documentation in Asciidoc, which is a text based format similar to Markdown. It is more powerful than Markdown and it can be nicely integrated into the Maven build to generate HTML and PDF output.
Because it is just text, we can easily store it in version control along with our source code. When we change the application, we can also update the documentation and review it in the same pull request.
README file
A project should always have a README.adoc or README.md file.
I know I said I use Asciidoc, but for the readme, I sometimes make an exception because GitHub renders the Markdown better than the Asciidoc.
What is part of the README?
-
How to build the application: Explains what Maven or Gradle commands to run to build the application.
-
How to run the application locally: Explains any steps you need to take to get started with running the application locally. Maybe you need to copy some file, fill in some secrets, …
-
How to release the application: Hopefully, you can just state here that you can run an action on your CI system. But usually, there are some extra steps involved like updating release notes somewhere, informing the right people, …
-
Anything special you need to know to run on certain environments (e.g. you need to something special on Windows, Linux or Mac)
-
How to configure your development environment: Maybe you need to have some IDE plugins, or configure the code style. If you have company-wide code style, just refer to the official docs you hopefully have somewhere.
-
The branching strategy used on the project.
-
The style of commit messages.
The goal should always be to have as little documentation as possible, but no less. If you can refer to an authoritative source outside your project, please do.
To know what the application actually does, and how it has been architected, is not part of the readme.
For that, we have our architecture documentation.
Architecture documentation
The architecture documentation provides a high-level overview of the architecture of the application. To ensure we don’t need to update the document too often, or that it just goes stale fast, we need to keep it high-level.
My rule of thumb is: What would I explain to a new member joining the team about this application? It would not be the nitty-gritty details, but the parts that make up the application and the domain model.
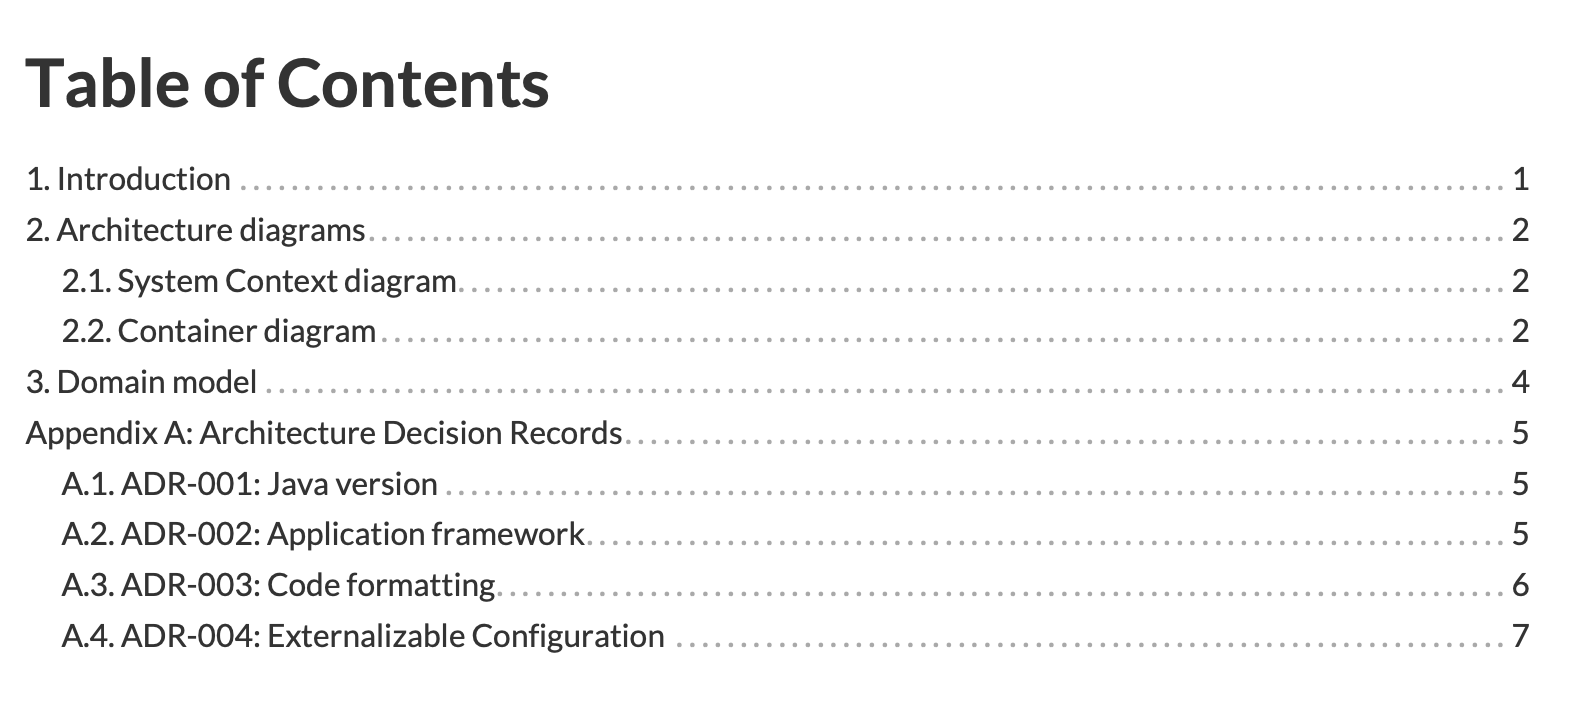
If we look at the table of contents of the petclinic example, we see these parts:
- Introduction
-
Provides a very high-level overview of what the application is and the goal it serves. This is usually one or two paragraphs.
- Architecture diagrams
-
This section contains the C4 System Context diagram and the C4 Container diagram. This is an example of a container diagram:
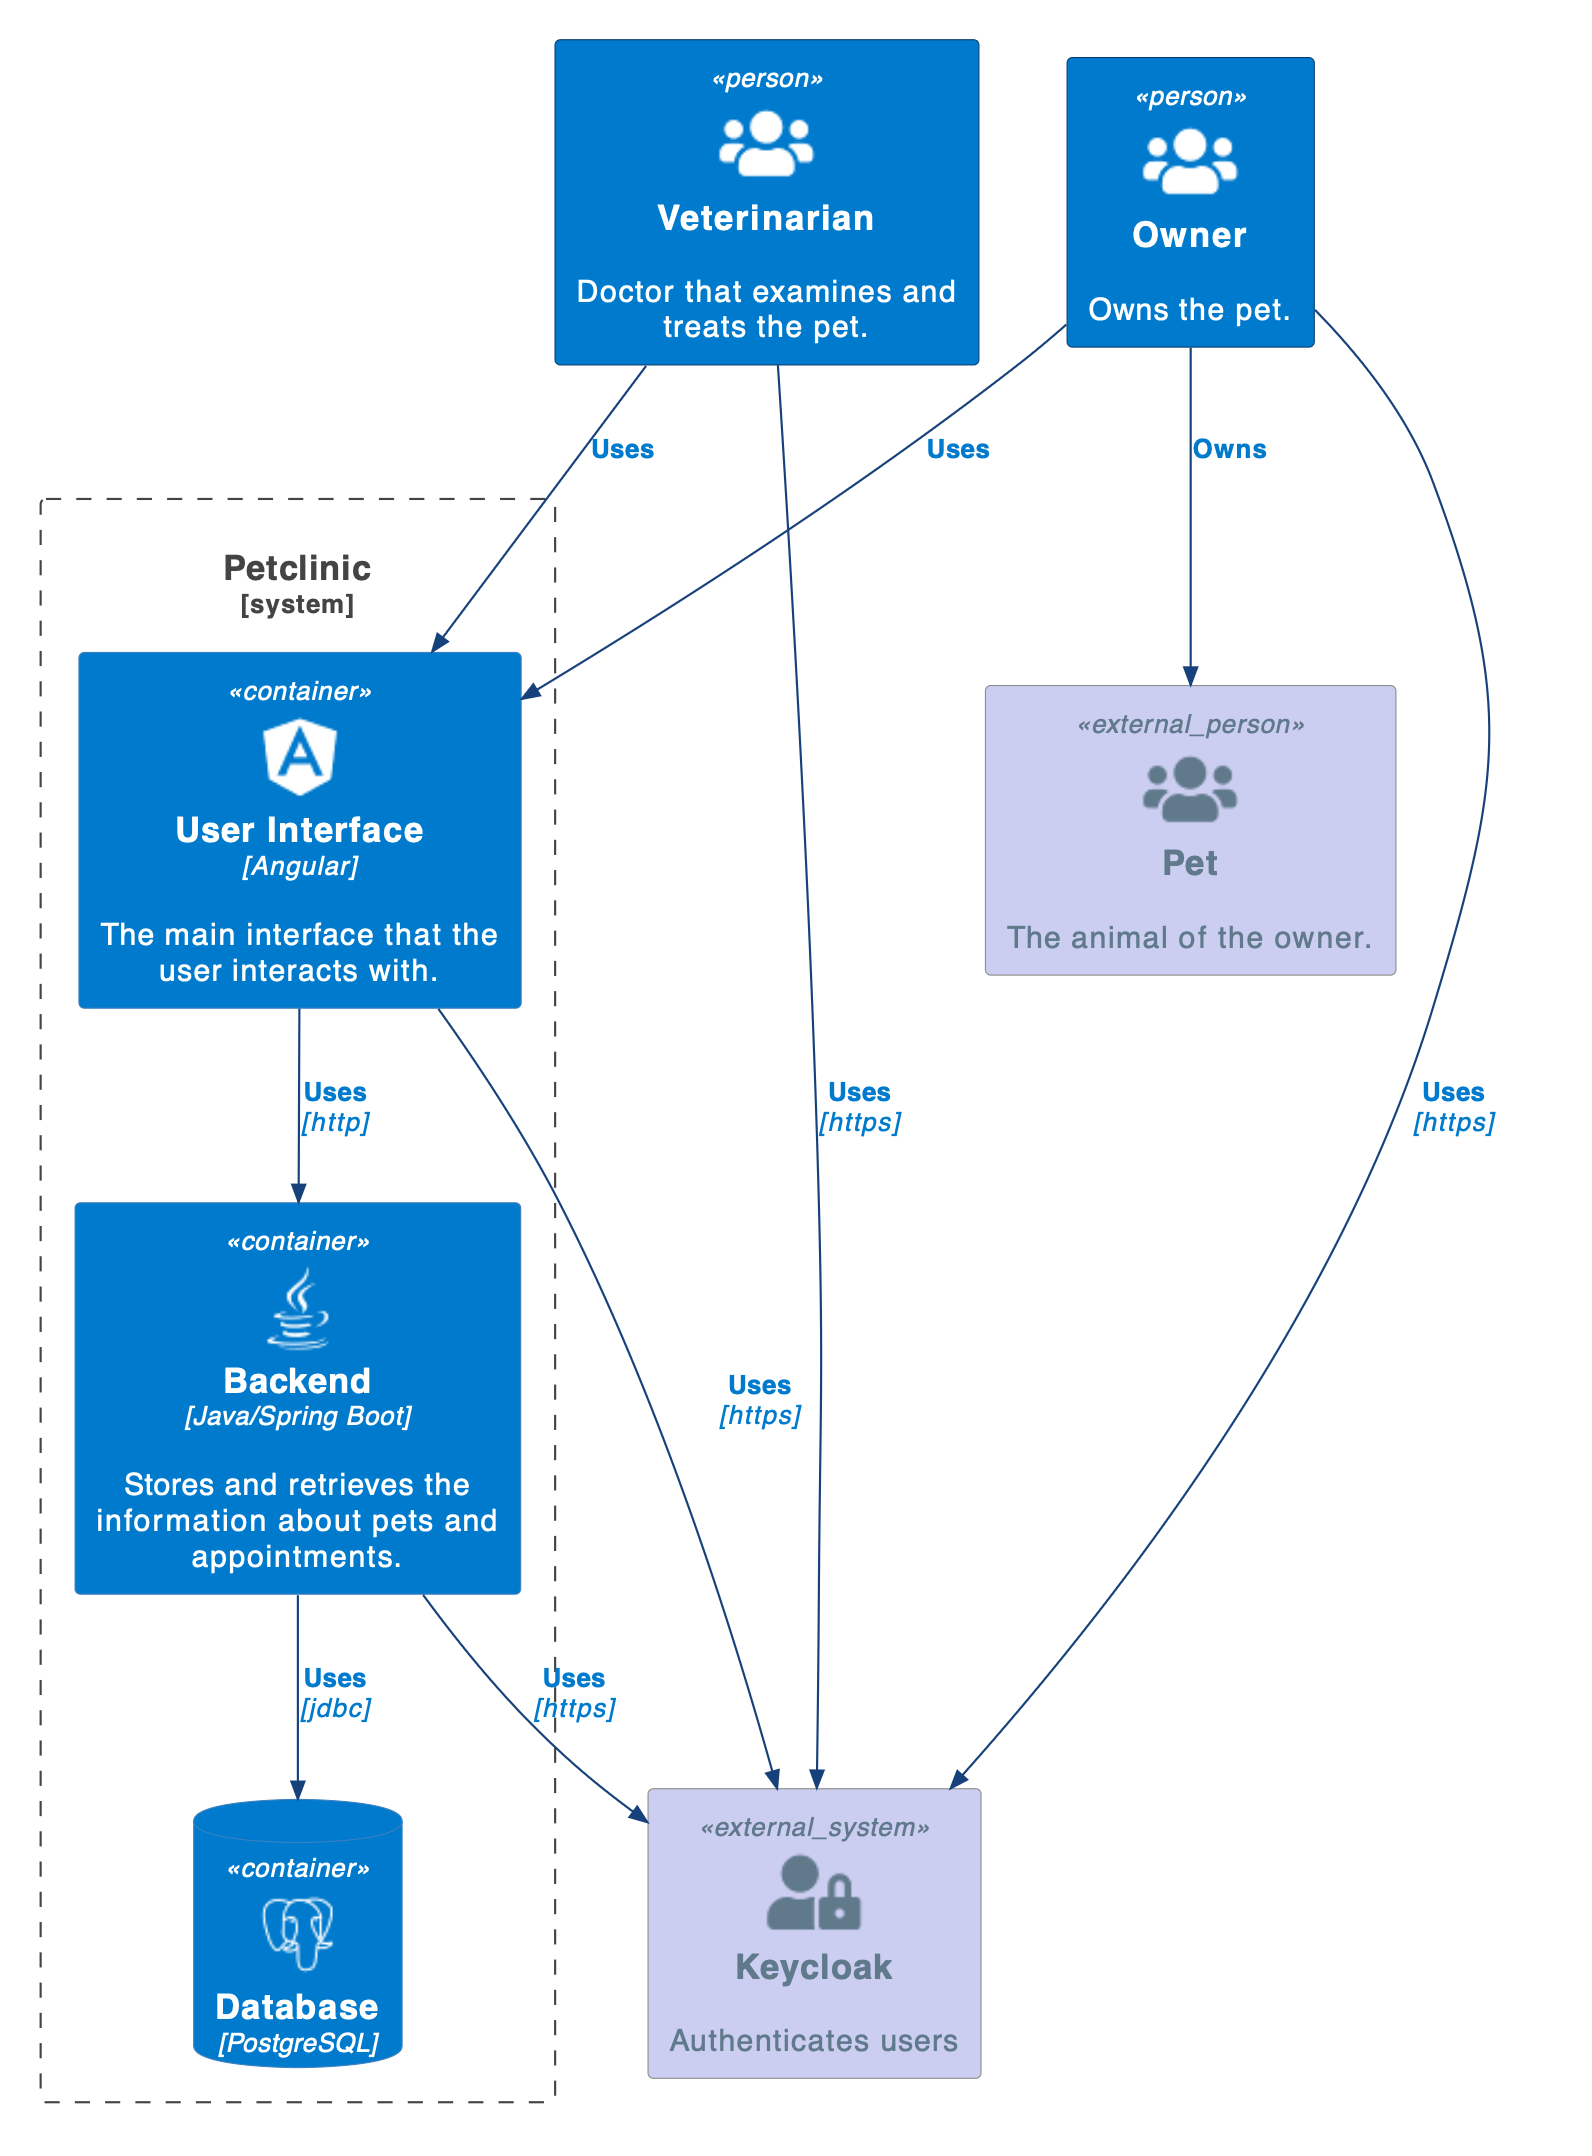
I find that this kind of diagram brings a lot of clarity. It is also high-level enough that you don’t need to update it that often.
In line with the documentation as code guideline, the diagrams are generated from PlantUML input which is also committed to version control. See c4-context-diagram.puml for the code that generates the above diagram.
If you prefer Mermaid to create diagrams, that is also certainly a valid option.
- Domain model
-
An important part of understanding an application is understanding the domain you are working in. Each domain has its specific terminology and terms you need to become familiar with. This is the section to explain that.
- Architecture Decision Records
-
The final part of the architecture documentation are the Architecture Decision Records. These document all the critical architecture decisions that have been made in this project. Each ADR is a separate Asciidoc document that gets included in the architecture master document, so the generated HTML and PDF have all the info.
Any project that has this kind of document would be a project where new people can get onboarded quickly. Either by reading it on their own, or for being a guideline for the person that needs to do the explaining.
Now that we’ve covered architecture documentation, let’s explore how to document REST APIs effectively.
REST API documentation
For applications which have a REST API, I love to use Spring REST Docs to document them. The basic idea is that you write a test that runs the actual code and capture the used request and response JSON. The test generates snippets that you include in the main Asciidoc document. This way, the documentation is always up-to-date. The test even fails when a field is not documented, or the field in the request or response does not match with what is documented.
I find that it delivers documentation that is better than using Swagger/OpenAPI for the following reasons:
-
The
@RestControlleris not cluttered with annotations for documenting how the endpoint behaves. If you want to use OpenAPI in a good way, you need lot and lots of annotations. This makes it hard to find the code buried in all those annotations. -
OpenAPI delivers something out of the box, without doing any work. I consider this a bad thing, because it makes the developer(s) lazy to come up with good documentation for the users of your API. If you don’t add any extra annotations, then the website that OpenAPI generates is quite useless as there is little information there.
-
With Spring REST Docs, you can use all the power of Asciidoc to help your readers. You can write some intro text, you can refer to other chapters, you can write some gotchas to watch out for, etc…
The only real drawback I see is that you don’t have this website that allows you to directly try and execute an endpoint.
As an example, this is part of VisitControllerDocumentationTest.java:
mockMvc.perform(post("/api/visits")
                        .contentType(MediaType.APPLICATION_JSON)
                        .content(String.format("""
                                                   {
                                                      "veterinarianId": "%s",
                                                      "ownerId": "%s",
                                                      "petId": "%s",
                                                      "appointmentTime": "2023-01-15T10:00:00Z"
                                                   }
                                                   """, veterinarian.getId().getId(), owner.getId().getId(), pet.getId().getId())))
        .andExpect(status().isCreated())
        .andDo(document("plan-visit", (1)
                        requestFields(
                            fieldWithPath("veterinarianId").description("The id of the veterinarian that will do the examination of the pet."),
                            fieldWithPath("ownerId").description("The id of the owner of the pet."),
                            fieldWithPath("petId").description("The id of the pet that will be examined."),
                            fieldWithPath("appointmentTime").description("The time when the veterinarian will be visiting the pet using ISO 8601 format, e.g. 2026-01-15T10:00:00Z.")
                        ), (2)
                        responseFields(
                            fieldWithPath("id").description("The unique identifier of the visit."),
                            fieldWithPath("veterinarianId").description("The id of the veterinarian that will do the examination of the pet."),
                            fieldWithPath("ownerId").description("The id of the owner of the pet."),
                            fieldWithPath("petId").description("The id of the pet that will be examined."),
                            fieldWithPath("appointmentTime").description("The time when the veterinarian will be visiting the pet using ISO 8601 format, e.g. 2026-01-15T10:00:00Z.")
))); (3)| 1 | This is the name of the directory where the generated snippets will be placed. |
| 2 | This documents all the fields of the request. |
| 3 | This documents all the fields of the response. |
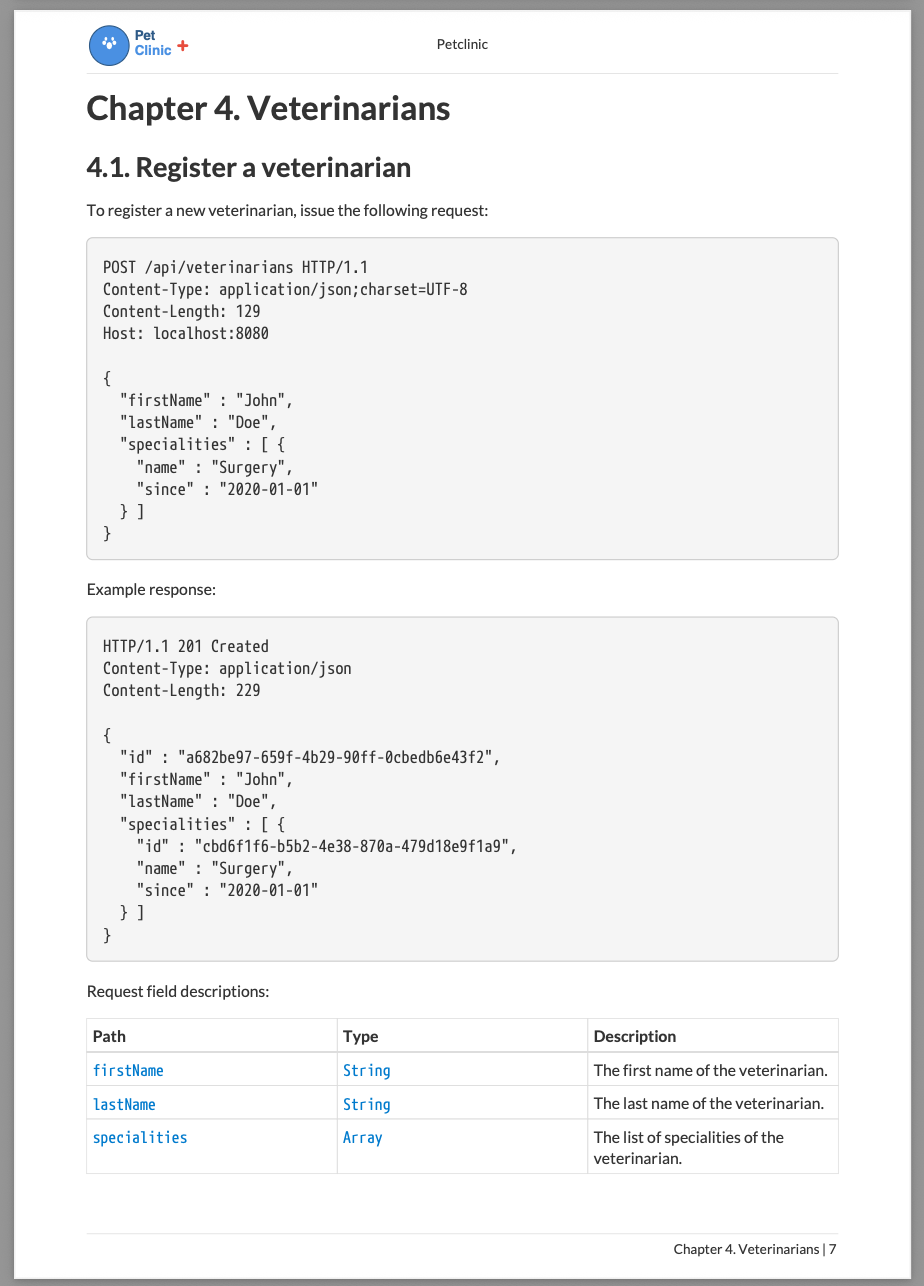
The Asciidoc document uses the generated snippets like this:
== Visits

=== Plan a visit for a pet

A visit for a pet can be planned with a veterinarian by issuing the following request:

include::{snippets}/plan-visit/http-request.adoc[]

Example response:

include::{snippets}/plan-visit/http-response.adoc[]

[NOTE]
====
It is important that the owner, pet and veterinarian already exist in the system.
See <<Owners>> and <<Veterinarians>> for more info on how to do that.
====

Request field descriptions:

include::{snippets}/plan-visit/request-fields.adoc[]

Response field descriptions:

include::{snippets}/plan-visit/response-fields.adoc[]
This Asciidoc rendered to PDF finally looks like this:
Once we have architecture and REST docs, we need an easy way for people to access them, which we will explore next.
Serving the documentation from the application
One neat little trick I like to use is to serve the architecture and the REST API docs from the Spring Boot application. It makes it easy for anybody to get the latest version of the docs. It also allows having different versions of the docs for QA and production, for example, to know what exactly is supported and what is not. Something that would be hard to do if you have those docs in an external system like Confluence or Notion.
The first thing you need to do is register the maven-resources-plugin to copy the generated docs into the /static folder on the classpath.
Spring Boot serves anything in that folder by default, which is just what we want for our documentation:
<plugin>
    <artifactId>maven-resources-plugin</artifactId>
    <executions>
        <execution>
            <id>copy-resources</id>
            <phase>prepare-package</phase> (1)
            <goals>
                <goal>copy-resources</goal>
            </goals>
            <configuration>
                <outputDirectory> (2)
                    ${project.build.outputDirectory}/static/docs
                </outputDirectory>
                <resources>
                    <resource>
                        <directory>
                            ${project.build.directory}/generated-docs
                        </directory>
                        <includes> (3)
                            <include>*.pdf</include>
                            <include>*.html</include>
                            <include>**/*.svg</include>
                            <include>**/*.png</include>
                        </includes>
                    </resource>
                </resources>
            </configuration>
        </execution>
    </executions>
</plugin>| 1 | Make the copy happen during the prepare-package phase of the Maven lifecycle.
This phase happens after compilation, but before the JAR file is created. |
| 2 | Copy the files to the /static/docs folder so they become available at http://localhost:8080/docs for example. |
| 3 | Copy the PDF and html versions that are generated by Asciidoctor.
The generated-docs source folder usually has some other files that we don’t need so we add this <includes> block. |
Now add a @Controller that serves a very basic HTML page linking to all the documentation:
import org.springframework.stereotype.Controller;
import org.springframework.web.bind.annotation.GetMapping;
import org.springframework.web.bind.annotation.RequestMapping;
import org.springframework.web.bind.annotation.ResponseBody;
@Controller
@RequestMapping("/docs")
public class DocumentationController {
@GetMapping
@ResponseBody
public String index() {
return """
<html lang="en">
<body>
<h1>Petclinic Documentation</h1>
<h3>REST API docs</h3>
<ul>
<li><a href="/docs/Petclinic REST API Documentation.pdf">PDF version</a></li>
<li><a href="/docs/Petclinic REST API Documentation.html">HTML version</a></li>
</ul>
<h3>Architecture docs</h3>
<ul>
<li><a href="/docs/Petclinic Architecture.pdf">PDF version</a></li>
<li><a href="/docs/Petclinic Architecture.html">HTML version</a></li>
</ul>
</body>
</html>""";
}
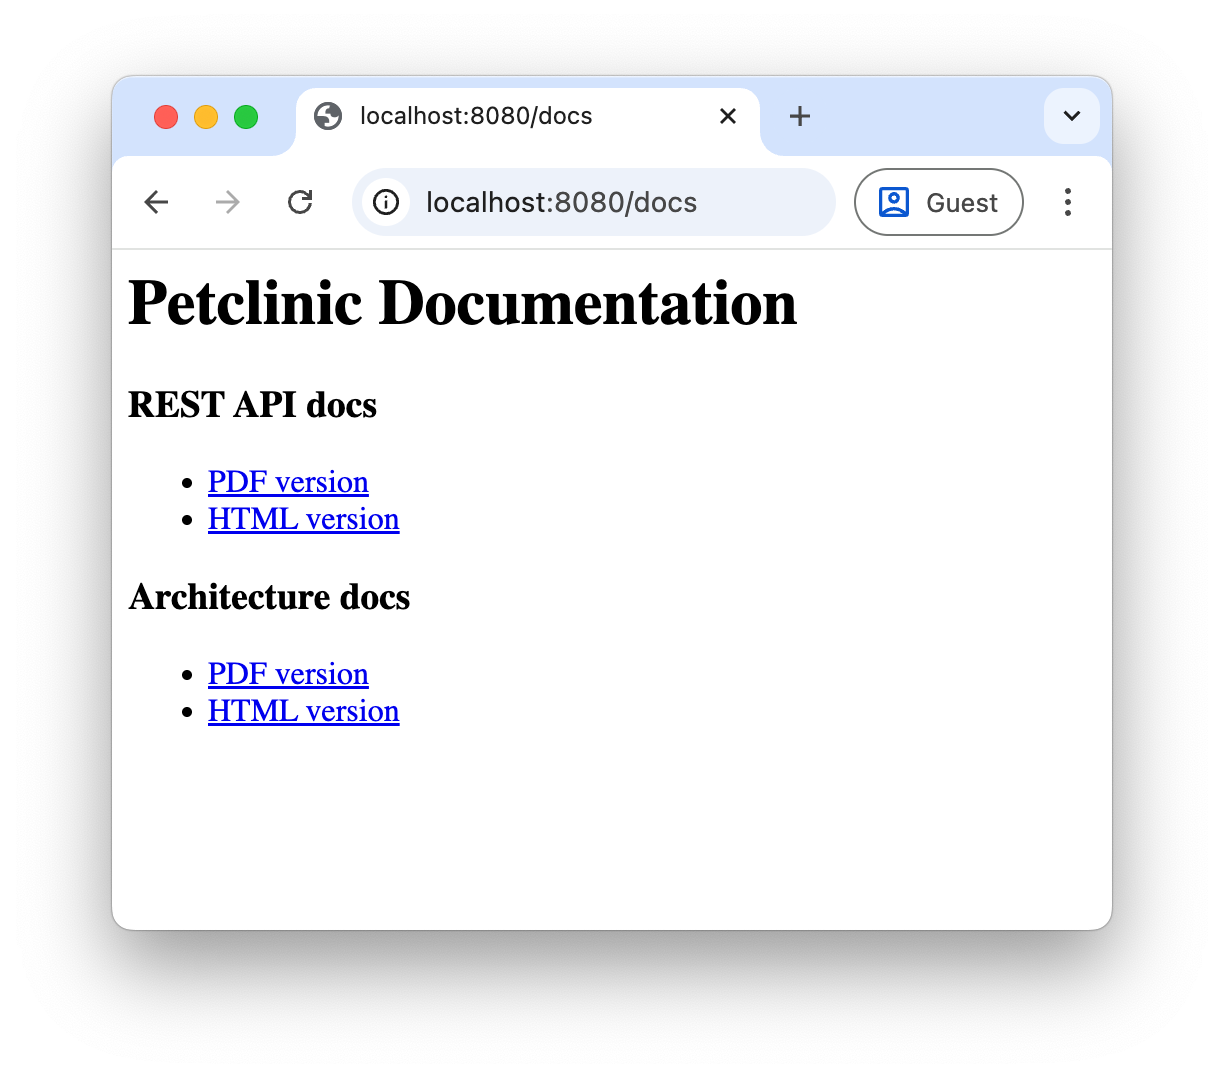
}This basic version is usually enough for the needs, but you could obviously add some styling or even throw in Thymeleaf or JTE to make a nice page.
Rendered in the browser, it looks like this:
|
If your application is secured (With Spring Security) then make sure to only allow exposure of the documentation to users/roles that you want. |
Conclusion
Many developers don’t really like to write documentation, but I think that using a system like this makes it as easy as it can be. Other developers on the team, future developers of the application and your future self will most likely be happy to have some info to get started/work on the project.
This concludes my three-part series on building production-ready Spring Boot applications. Together, these posts have covered the essential aspects that transform a basic Spring Boot application into something truly production-ready:
-
Architecture and Code Organization: Structuring applications around domain aggregates for maintainability and clarity
-
Testing Strategy: Comprehensive testing from unit tests to integration tests ensuring reliability
-
Documentation: Treating documentation as code to ensure it remains accurate and accessible
By applying these practices consistently, you’ll create Spring Boot applications that are not only functional but also maintainable, testable, and well-documented - the hallmarks of production-ready software.
See wimdeblauwe/petclinic on GitHub for the full sources of these examples.
If you have any questions or remarks, feel free to post a comment at GitHub discussions.
If you want to be notified in the future about new articles, as well as other interesting things I'm working on, join my mailing list!
I send emails quite infrequently, and will never share your email address with anyone else.