# Writing a Thymeleaf component library - part 4
Author: [Wim Deblauwe](https://www.wimdeblauwe.com/about/) | Published: 2026-08-17 | Topics: thymeleaf, spring-boot, alpine | Canonical: https://www.wimdeblauwe.com/blog/2026/08/17/writing-a-thymeleaf-component-library---part-4/
After [creating a Thymeleaf component library](https://wimdeblauwe.com/blog/2026/07/27/writing-a-thymeleaf-component-library), [building a component](https://www.wimdeblauwe.com/blog/2026/08/03/writing-a-thymeleaf-component-library---part-2/) and adding [support for slots](https://www.wimdeblauwe.com/blog/2026/08/10/writing-a-thymeleaf-component-library---part-3/), we will now turn our attention to adding client-side interactivity to a component.
## AlpineJS
We could use JavaScript to add interactivity by adding it to `src/main/resources/static/js/tcl.js` directly, or import a script there. However, I like to use [AlpineJS](https://alpinejs.dev/) instead. I find the reactive and declarative style real easy to work with.
Add the following dependencies to the `pom.xml`:
```xml
org.webjarswebjars-locator-liteorg.webjars.npmalpinejs${alpinejs.version}org.webjars.npmalpinejs__focus${alpinejs.version}
```
Add the `alpinejs.version` property in the `` section of the `pom.xml` like this:
```xml
3.15.12
```
This allows to reference AlpineJS via [Webjars](https://www.webjars.org/). It ensures we serve the JavaScript library from our own domain, and not from a CDN.
To make it easy for the users of our component library to use AlpineJS, we will add a `webjars` fragment that will include the necessary scripts in the page:
**src/main/resources/templates/tcl/layout.html**
```html
```
## The dialog component
We will now create a dialog component that uses AlpineJS for interactivity.
**src/main/resources/templates/tcl/components/dialog.html**
```html
```
There is quite a bit going on in this component, so let’s go through it step by step.
- `th:fragment="dialog"` → name of the fragment.
- `th:with` → we define some local variables that we will use in the component. We check if the `attrs` map contains a value for the title, confirmation button label and cancel button label. If not, we use default values.
- `class="tcl-dialog"` → we add a CSS class to the root element of the component. This allows us to style the component using CSS.
- `x-data` → we define a local AlpineJS component with some state and methods. The `dialogOpen` state variable is used to control the visibility of the dialog. The `cancel` and `confirm` methods are used to close the dialog and dispatch events to the parent component.
- `x-show` → we use the `dialogOpen` state variable to control the visibility of the dialog. When `dialogOpen` is `true`, the dialog is visible. When it is `false`, the dialog is hidden.
- `x-trap` → we use the `x-trap` directive to trap the focus inside the dialog when it is open. This is important for accessibility.
- `@keydown.escape.window` and `@keydown.enter.window` → we listen for the escape and enter keys to close the dialog. When the escape key is pressed, we call the `cancel` method. When the enter key is pressed, we call the `confirm` method.
- `tcl:attrsExcept` → we use this attribute to pass all attributes except the ones we defined in `th:with` to the root element of the component. This allows us to pass additional attributes to the dialog, such as `id`, `class`, etc.
- The rest of the component is just HTML and Thymeleaf syntax to render the dialog content, title, and buttons. We use the `tcl:slot` element to allow the user to pass in custom content for the dialog. We also use the `tcl:button` component we created in part 2 to render the buttons.
The dialog is styled using this CSS:
**src/main/resources/static/css/dialog.css**
```css
.tcl-dialog {
z-index: 10001;
align-items: center;
justify-content: center;
display: flex;
flex-direction: column;
position: fixed;
top: 0;
left: 0;
width: 100%;
height: 100%;
.tcl-dialog-overlay {
opacity: 0.32;
background-color: #000000f5;
position: fixed;
top: 0;
left: 0;
width: 100%;
height: 100%;
}
.tcl-dialog-window {
border-radius: 0.5rem;
position: relative;
background-color: white;
.tcl-dialog-titlebar {
display: flex;
flex-direction: row;
flex-shrink: 0;
align-items: center;
gap: 0.75rem;
padding-block: 1.5rem 1rem;
padding-inline: 1.5rem;
border-bottom: 1px solid #d97706;
.tcl-dialog-title {
width: 100%;
flex-basis: 0;
flex-grow: 1;
flex-shrink: 1;
overflow-x: hidden;
overflow-y: hidden;
font-weight: bold;
padding: 0.5rem 0;
}
.tcl-dialog-titlebar-actions {
div {
padding-right: 5px;
padding-left: 5px;
svg {
width: 1rem;
height: 1rem;
padding: 0.25rem;
cursor: pointer;
&:hover {
background-color: #d97706;
}
}
}
}
}
.tcl-dialog-content {
padding: 1rem;
min-height: 25px;
overflow: auto;
position: relative;
flex: 1 1 auto;
}
.tcl-dialog-actions {
display: flex;
flex-flow: row wrap;
flex: 0 0 auto;
align-items: center;
gap: 0.75rem;
border-top: 1px solid #d97706;
padding: 1.5rem;
* {
flex: 1 0 0;
}
}
}
}
```
Don’t forget to import it in the main `tcl.css` file:
**src/main/resources/static/css/tcl.css**
```css
@import 'button.css';
@import 'dialog.css';
```
That is it for the dialog component. We can now render a dialog using `tcl:dialog` and we can react to the `dialog-confirmed` and `dialog-cancelled` events that are dispatched by the component.
## Using the dialog component
We need a few bits in place to use the dialog component in our application.
1. Something that triggers the dialog to open. In this case, we will use a button.
2. A place to render the dialog. We will use a `div` with an `id` of `modal-root`.
3. The dialog itself, which we will render using the `tcl:dialog` component inside a fragment in the application.
4. The action that is executed when the dialog is confirmed.
We can add our triggering button to `index.html` for testing:
```html
Delete user 123
```
We will use htmx to load the dialog component into the `modal-root` div when the button is clicked. The `hx:get` attribute specifies the URL to fetch, and the `hx-target` attribute specifies where to render the response.
Update `layout/main.html` to have an empty div where the dialog can be rendered:
**src/main/resources/templates/layout/main.html**
```html
...
(1)
(2)
...
```
1. Empty div where the dialog can be rendered.
2. Include the `webjars` fragment we created earlier, so that AlpineJS is available in the page.
Now for the dialog itself, we create a `fragments/dialog.html` file in the application that will render the dialog component:
```html
[[${message}]]
```
We set `hx-trigger` to `dialog-confirmed`, which is the event that is dispatched by AlpineJS when the user clicks the confirmation button in the dialog. We also set `hx:delete` to the URL that will delete the user.
The combination of those two attributes will ensure that when the user clicks the confirmation button, the dialog will be closed and a `DELETE` request will be sent to the server.
The `message` variable is put in the default slot of the dialog component, so it will be rendered in the content area of the dialog. As it is a slot, we could place any HTML content in there, but for this example we will just use a simple message.
Finally, we need a controller method that will return this fragment when the button is clicked, and a method that will handle the `DELETE` request when the user confirms the deletion:
```java
package com.wimdeblauwe.examples.tcl.tcl_sample_01;
import io.github.wimdeblauwe.htmx.spring.boot.mvc.HtmxRedirectView;
import io.github.wimdeblauwe.htmx.spring.boot.mvc.HxRequest;
import org.springframework.stereotype.Controller;
import org.springframework.ui.Model;
import org.springframework.web.bind.annotation.DeleteMapping;
import org.springframework.web.bind.annotation.GetMapping;
import org.springframework.web.bind.annotation.PathVariable;
import org.springframework.web.bind.annotation.RequestMapping;
@RequestMapping("/users")
@Controller
public class UserController {
@GetMapping("/{id}")
public String showDeleteDialog(@PathVariable String id, Model model) { (1)
model.addAttribute("message", "Are you sure you want to delete user '%s'?".formatted(id));
model.addAttribute("id", id);
return "fragments/dialogs :: delete-dialog"; (2)
}
@HxRequest
@DeleteMapping("/{id}")
public HtmxRedirectView deleteUser(@PathVariable String id, Model model) { (3)
// Delete the user via a service or use case here
return new HtmxRedirectView("/");
}
}
```
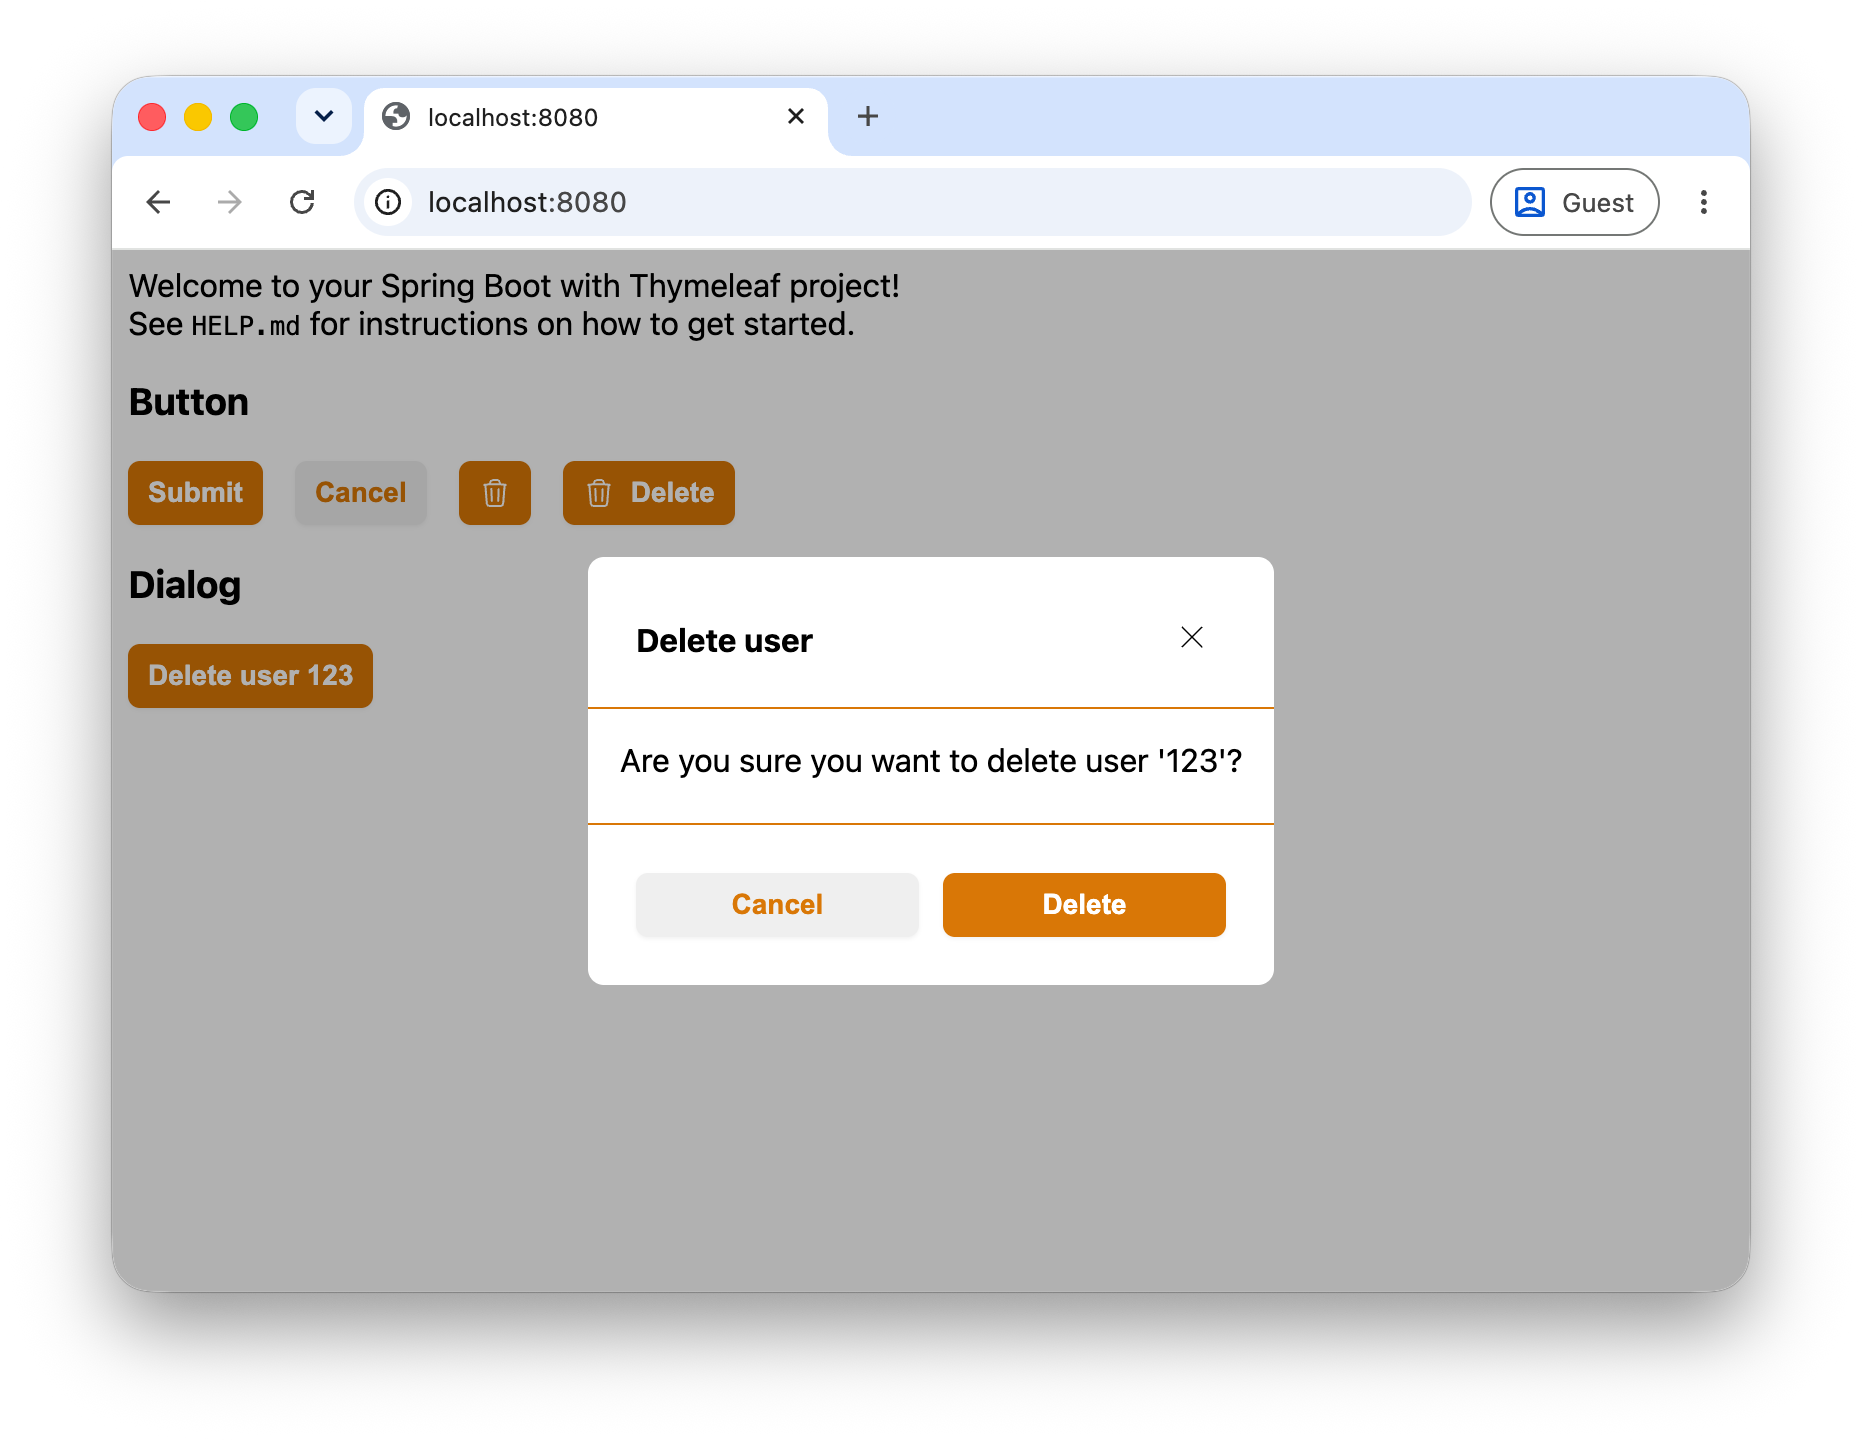
1. This method is called when the user clicks the button to delete a user. It adds the message and id to the model, and returns the `delete-dialog` fragment.
2. We can reference a specific fragment in a template by using the `::` syntax. In this case, we are referencing the `delete-dialog` fragment in the `fragments/dialogs.html` template.
3. This method is called when the user confirms the deletion of the user. It deletes the user and returns a redirect to the home page.
The nice thing about using htmx to display the dialog is: we have full access to the backend services to show additional information in the dialog, such as the name of the user to be deleted.
Suppose this is a table of users, each with a delete button. If you would fully handle this client side, then there needs to be a template of the dialog already present in the html, and you need to pass the user information to the dialog via JavaScript. This is not a big deal (I have an example of this in [Taming Thymeleaf](https://www.wimdeblauwe.com/books/taming-thymeleaf/)) , but it is a bit more work than just letting the backend render the dialog with the correct information.
The result in the browser should look like this:
## Conclusion
This was the last part of the series on writing a Thymeleaf component library.
The series showed that it is possible to create a component library for Thymeleaf, and that it is not that hard to do. From this point on, you can start creating your own components and use them in your applications.
See [thymeleaf-component-library](https://github.com/wimdeblauwe/blog-example-code/tree/master/thymeleaf-component-library) on GitHub for the full sources of these examples.
If you have any questions or remarks, feel free to post a comment at [GitHub discussions](https://github.com/wimdeblauwe/wimdeblauwe.com/discussions).