pom.xml
src/main/java/.../Application.java
src/main/resources/application.properties
src/test/java/...Spring Boot application with exploded directory structure

Spring Boot is really amazing for getting started quickly with a new Spring application. By default, your application is contained in a single jar when packaging it. This has some advantages, but what if you want a "classic" layout with a config folder (for your application.properties or logback.xml files) and a lib folder?
Getting Started
This blog post will show you a way of doing this using Maven and the Maven Assembly Plugin.
First, we create a simple project using the Spring Initializr. I opted for Java 8 and selected the "Web" dependency. The current Spring Boot version is 1.1.8.
This gave me a zip file with the following structure:
For some fun, I added a simple rest controller:
package org.deblauwe.example.boot.exploded;

import org.springframework.beans.factory.annotation.Value;
import org.springframework.web.bind.annotation.RequestMapping;
import org.springframework.web.bind.annotation.RestController;

@RestController
@RequestMapping("/test")
public class TestController {

    @Value("${hello.value:World}")
    private String helloValue;

    @RequestMapping("/")
    public String sayHello() {
        return "Hello " + helloValue;
    }
}
Running this application and pointing to http://localhost:8080/test/ returns "Hello World" in the browser.
We can now inject a different value into 'helloValue' by adding the following line to application.properties:
hello.value=MavenIf you now refresh the browser, it shows: Hello Maven
Creating the assembly
We now want to build a zip file out of this simple application with the following layout:
start.shconfig/application.propertieslib/spring-boot-exploded-example-0.0.1-SNAPSHOT.jarFor this, we add the Maven Assembly Plugin to our pom.xml:
<build>
    <plugins>

        ...
        <plugin>
            <artifactId>maven-assembly-plugin</artifactId>
            <configuration>
                <descriptors>
                    <descriptor>src/main/assembly/descriptor.xml</descriptor>
                </descriptors>
            </configuration>

            <executions>
                <execution>
                    <id>make-assembly</id> <!-- this is used for inheritance merges -->
                    <phase>package</phase> <!-- bind to the packaging phase -->
                    <goals>
                        <goal>single</goal>
                    </goals>
                </execution>
            </executions>
        </plugin>
We also create the descriptor.xml file in the src/main/assembly folder:
<assembly xmlns="http://maven.apache.org/plugins/maven-assembly-plugin/assembly/1.1.2"
          xmlns:xsi="http://www.w3.org/2001/XMLSchema-instance"
          xsi:schemaLocation="http://maven.apache.org/plugins/maven-assembly-plugin/assembly/1.1.2 http://maven.apache.org/xsd/assembly-1.1.2.xsd">

    <id>application</id>
    <formats>
        <format>zip</format>
    </formats>

    <fileSets>
        <fileSet>
            <directory>${project.basedir}/src/main/resources</directory>
            <outputDirectory>/config</outputDirectory>
            <includes>
                <include>application.properties</include>
            </includes>
        </fileSet>

        <fileSet>
            <directory>${project.basedir}/src/main/assembly</directory>
            <outputDirectory>/</outputDirectory>
            <filtered>true</filtered>
            <fileMode>0755</fileMode>
            <includes>
                <include>*.sh</include>
            </includes>
        </fileSet>

        <fileSet>
            <directory>${project.build.directory}</directory>
            <outputDirectory>/lib</outputDirectory>
            <includes>
                <include>*.jar</include>
            </includes>
        </fileSet>
    </fileSets>
</assembly>
The final piece is the start.sh file. Place this one also in the src/main/assembly folder:
#!/bin/sh
DIR=`dirname $0`
cd $DIR
java -jar lib/${project.artifactId}-${project.version}.jar --spring.profiles.active=prod $*
The assembly plugin will replace project.artifactId and project.version during the build. The --spring.profiles.active=prod is not needed for this sample application, but it shows how you can force a certain Spring profile in the startup script.
Now run: mvn package
This will create a zip file in the target folder with exactly the layout like we wanted:

So now it becomes very easy to change something in application.properties if needed.
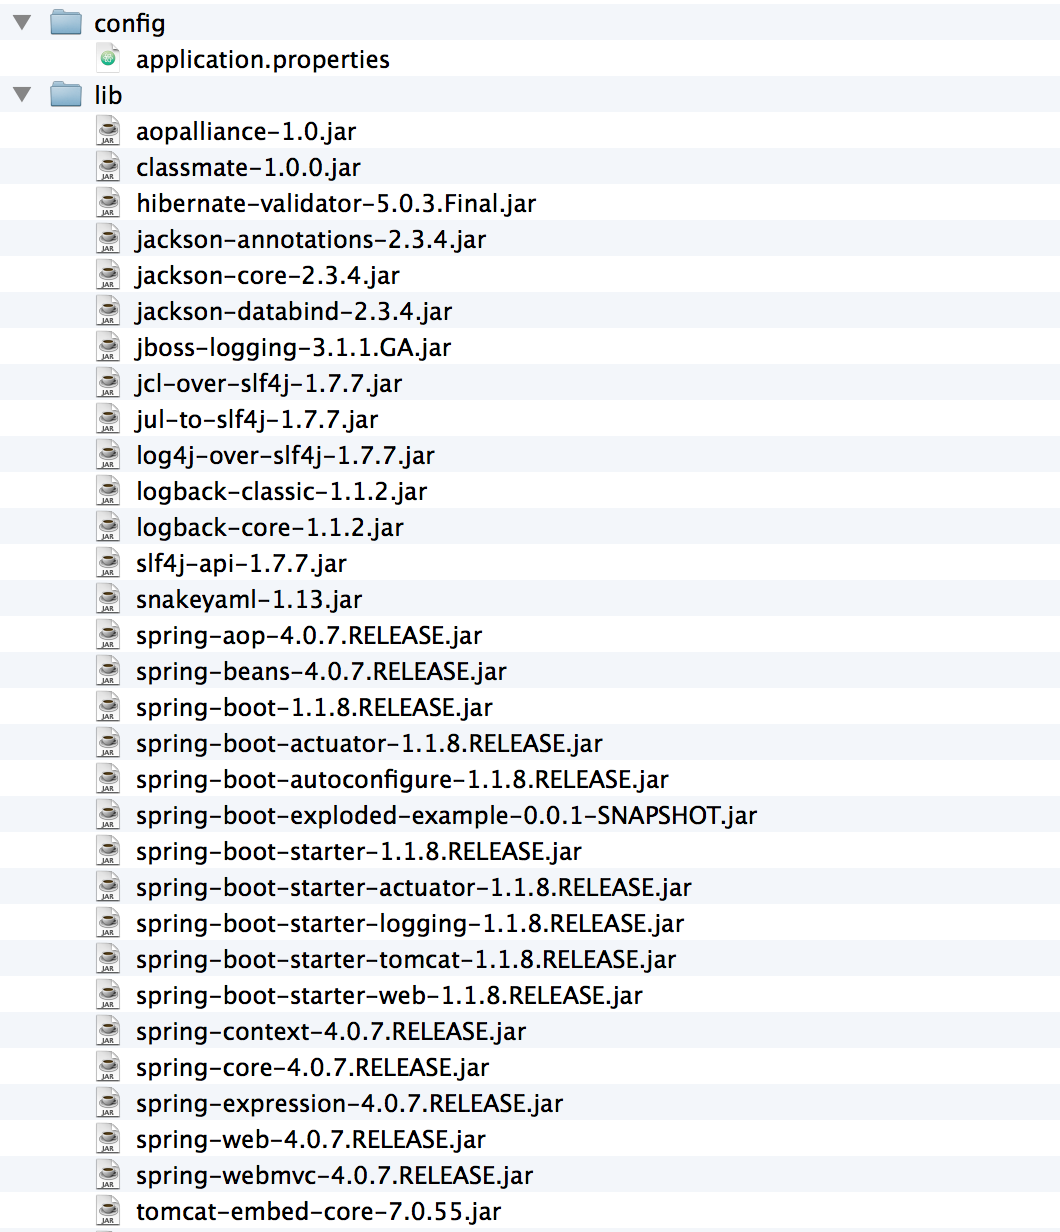
Assembly with all jar files separately
We can now take this one step further. Maybe you want to have all the jar files separately in the lib folder, just in case you need to patch one of your dependencies, or you just want to test something quickly? For this, we need to remove the spring-boot-maven-plugin in the pom.xml. After this, update the assembly descriptor:
<assembly xmlns="http://maven.apache.org/plugins/maven-assembly-plugin/assembly/1.1.2"
          xmlns:xsi="http://www.w3.org/2001/XMLSchema-instance"
          xsi:schemaLocation="http://maven.apache.org/plugins/maven-assembly-plugin/assembly/1.1.2 http://maven.apache.org/xsd/assembly-1.1.2.xsd">

    <id>application</id>
    <formats>
        <format>zip</format>
    </formats>

    <dependencySets>
        <dependencySet>
            <outputDirectory>lib</outputDirectory>
            <unpack>false</unpack>
        </dependencySet>
    </dependencySets>

    <fileSets>
        <fileSet>
            <directory>${project.basedir}/src/main/resources</directory>
            <outputDirectory>/config</outputDirectory>
            <includes>
                <include>application.properties</include>
            </includes>
        </fileSet>

        <fileSet>
            <directory>${project.basedir}/src/main/assembly</directory>
            <outputDirectory>/</outputDirectory>
            <filtered>true</filtered>
            <fileMode>0755</fileMode>
            <includes>
                <include>*.sh</include>
            </includes>
        </fileSet>
    </fileSets>
</assembly>
Notice the dependencySets that has been added and the fileSet for the jar has been removed.
You also need to edit the start.sh startup script to load all jar files from the lib directory:
#!/bin/shDIR=`dirname $0`cd $DIRjava -cp .:./config:./lib/* ${start-class} --spring.profiles.active=prod $*After running mvn clean package, you end up with a zip file with this structure:

Conclusion
I showed how can you easily use the Maven assembly plugin to output your project in a zip file so you can edit properties without having to unjar the jar file like in the standard Spring Boot setup. I find this extremely useful for things like changing the log level settings for example.
