
Introduction to using JavaFX with afterburner.fx
I wanted to try out afterburner.fx, a JavaFX framework which describes itself as:
a minimalistic (3 classes) JavaFX MVP framework based on Convention over Configuration and Dependency Injection.
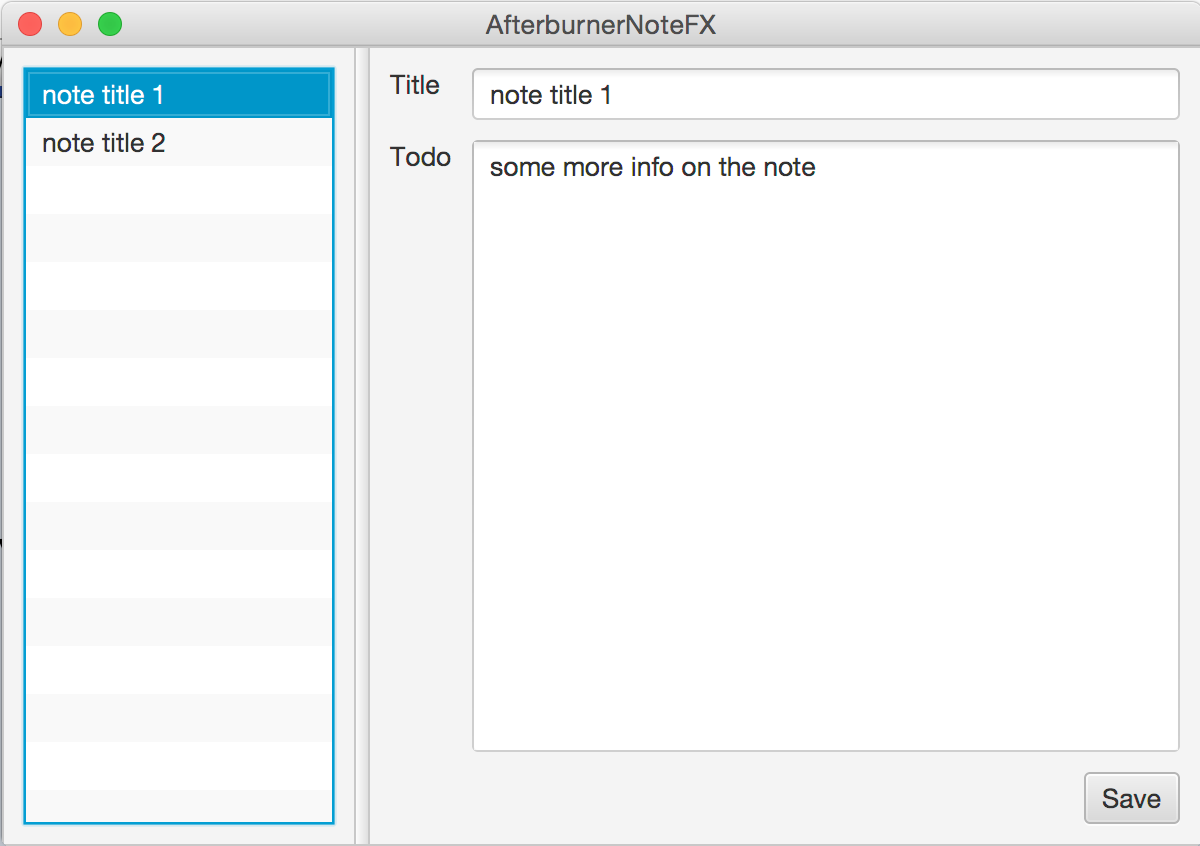
For this purpose I created a simple note taking application which looks like this when finished:
First off, the domain class that represents a Note:
public class Note {
    private long id;
    private String title;
    private String content;

    // Getter and setters ommitted
I also made a NoteService to retrieve the current notes and update an existing note:
public interface NoteService {

    SortedSet<Note> getNotes();

    void updateNode(Note note);
}
I have made an in memory implementation for testing purpose:
public class InMemoryNoteService implements NoteService {

    private Map<Long, Note> notes = new HashMap<>();

    public InMemoryNoteService() {
        notes.put(1L, new Note(1, "note title 1", "some more info on the note"));
        notes.put(2L, new Note(2, "note title 2", "some more info on the other note"));
    }

    @Override
    public SortedSet<Note> getNotes() {
        TreeSet<Note> treeSet = new TreeSet<>(new NoteComparator());
        treeSet.addAll(notes.values());
        return treeSet;
    }

    @Override
    public void updateNode(Note note) {
        notes.put(note.getId(), note);
    }
}
Now, off to the actual JavaFX stuff. We start with creating our FXML code that defines the components in our application:
<SplitPane dividerPositions="0.3" maxHeight="-Infinity" maxWidth="-Infinity" minHeight="-Infinity"
           minWidth="-Infinity" prefHeight="400.0" prefWidth="600.0" xmlns:fx="http://javafx.com/fxml/1"
           xmlns="http://javafx.com/javafx/8.0.40" fx:controller="org.deblauwe.afterburnernote.view.MainPresenter">

    <items>

        <BorderPane minHeight="0.0" minWidth="100.0" prefHeight="398.0" prefWidth="176.0"
                    styleClass="defaultBorderSpacing">

            <center>
                <ListView fx:id="listView"/>
            </center>

        </BorderPane>

        <GridPane minHeight="0.0" minWidth="0.0" prefHeight="160.0" prefWidth="100.0" styleClass="defaultBorderSpacing">
            <rowConstraints>
                <RowConstraints vgrow="NEVER" valignment="TOP"/>
                <RowConstraints vgrow="ALWAYS" valignment="TOP"/>
                <RowConstraints vgrow="NEVER"/>
            </rowConstraints>

            <columnConstraints>
                <ColumnConstraints hgrow="NEVER"/>
                <ColumnConstraints hgrow="ALWAYS"/>
            </columnConstraints>

            <Label text="Title" GridPane.rowIndex="0" GridPane.columnIndex="0"/>
            <TextField fx:id="titleField" prefWidth="308.0" GridPane.rowIndex="0" GridPane.columnIndex="1"/>
            <Label layoutX="14.0" text="Todo" GridPane.rowIndex="1" GridPane.columnIndex="0"/>
            <TextArea fx:id="contentField" prefWidth="308.0" GridPane.rowIndex="1" GridPane.columnIndex="1"/>

            <Button fx:id="saveButton" text="Save" GridPane.rowIndex="2" GridPane.columnIndex="0"
                    GridPane.columnSpan="2" GridPane.halignment="RIGHT"/>

        </GridPane>
    </items>
</SplitPane>
What is important is the use of the fx:controller attribute which needs to point a controller that defines the behaviour. I named my FXML main.fxml and I followed the convention to name the controller nameofviewPresenter.
Before I show the presenter, you also need a View, which I called MainView. It does not contain any actual code, it just extends from FXMLView (which is a class from the afterburner.fx framework):
public class MainView extends FXMLView {

}
The MainPresenter contains the bulk of the code:
public class MainPresenter implements Initializable {

    @FXML
    public TextArea contentField;

    @FXML
    public Button saveButton;

    @FXML
    private ListView<Note> listView;

    @FXML
    private TextField titleField;

    @Inject
    private NoteService noteService;

// ------------------------ INTERFACE METHODS ------------------------

// --------------------- Interface Initializable ---------------------

    @Override
    public void initialize(URL location, ResourceBundle resources) {

        listView.setCellFactory(param -> new NoteListCell());
        listView.setItems(FXCollections.observableArrayList(noteService.getNotes()));
        listView.getSelectionModel().selectedItemProperty().addListener(new NoteListViewSelectionChangeListener());

        selectFirstItemIfPossible();

        saveButton.setOnAction(event -> {
            // Save the updated note with the service

            Note selectedItem = listView.getSelectionModel().getSelectedItem();
            selectedItem.setTitle(titleField.getText());
            selectedItem.setContent(contentField.getText());
            noteService.updateNode(selectedItem);

            listView.getItems().set(listView.getSelectionModel().getSelectedIndex(), selectedItem);
            listView.getItems().sort(new NoteComparator());
        });
    }

// -------------------------- PRIVATE METHODS --------------------------

    private void selectFirstItemIfPossible() {
        if (listView.getItems().size() > 0) {
            listView.getSelectionModel().select(0);
        }
    }

// -------------------------- INNER CLASSES --------------------------

    private static class NoteListCell extends ListCell<Note> {

        @Override
        protected void updateItem(Note item, boolean empty) {
            super.updateItem(item, empty);

            if (item != null) {
                setText(item.getTitle());
            }
        }
    }

    private class NoteListViewSelectionChangeListener implements ChangeListener<Note> {

        @Override
        public void changed(ObservableValue<? extends Note> observable, Note oldValue, Note newValue) {
            if (newValue != null) {
                titleField.setText(newValue.getTitle());
                contentField.setText(newValue.getContent());
            }
        }
    }
}
Let us break this down a bit. First we can reference any component that is declared in the FXML file by using the @FXML annotation on a private field.
For example:
@FXML
public Button saveButton;
Note that the name of the field should match with the fx:id in the FXML file for this to work:
<Button fx:id="saveButton" text="Save" GridPane.rowIndex="2" GridPane.columnIndex="0" GridPane.columnSpan="2" GridPane.halignment="RIGHT"/>@Inject allows to inject arbitrary values or services. Here, I used it to get a reference to the NoteService:
@Inject
private NoteService noteService;
To have this working, you need to setup the injection in your main class. This is what I have:
public class Main extends Application {

    @Override
    public void start(Stage primaryStage) throws Exception {

        Map<Object, Object> context = new HashMap<>();
        context.put("noteService", new InMemoryNoteService());

        Injector.setConfigurationSource(context::get);
        MainView mainView = new MainView();

        Scene scene = new Scene(mainView.getView());
        primaryStage.setTitle("AfterburnerNoteFX");
        primaryStage.setScene(scene);
        primaryStage.show();
    }
}
The Injector has a static method which needs a Function. So anything that returns an Object, given another Object is ok. A Java 8 method reference to the get method of a Map is probably the easiest.
Notice that the key in the Map has to match with the field name of the @Inject annotation in the controller.
To make it good looking, we add a CSS file which has the same name as the FXML file (So main.css in my example):
.defaultBorderSpacing {
-fx-border-width: 10;
-fx-border-color: transparent;
}
GridPane {
-fx-hgap: 10;
-fx-vgap: 10;
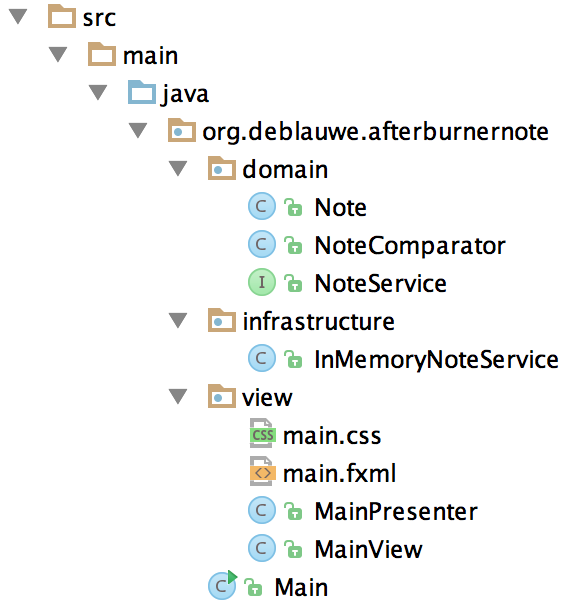
}This the full file tree for the application:
This concludes my introduction. Please take a look at the website for some more info and links to other example projects. I really like what afterburner.fx provides. It would be even better if this could be combined with the Spring Framework to have a more feature rich dependency injection, but I can understand that this would totally clash with the minimalistic goal of the framework.
If you want to be notified in the future about new articles, as well as other interesting things I'm working on, join my mailing list!
I send emails quite infrequently, and will never share your email address with anyone else.