|
This blog post was written for asciidoctor-pdf 1.x.
If you are using asciidoctor-pdf 2.x, then be aware that you need to use So replace: with: |
Using Asciidoc (the markup language) with the Asciidoctor toolchain is one of our favorite ways to write documentation. We mainly use it to create API documentation from our REST API backends using Spring REST Docs.
Asciidoctor supports a variety of output formats, where HTML and PDF are ones we used the most. While the default PDF output already looks very good, it is always nice to be able customize the output a bit to better align with the project the documentation is created for. This post will explain exactly how to do that.
To get started, we’ll create a simple Maven project to generate the PDF output. First, create a pom.xml file with this contents to configure the asciidoctor-maven-plugin:
<?xml version="1.0" encoding="UTF-8"?>
<project xmlns="http://maven.apache.org/POM/4.0.0" xmlns:xsi="http://www.w3.org/2001/XMLSchema-instance"
xsi:schemaLocation="http://maven.apache.org/POM/4.0.0 https://maven.apache.org/xsd/maven-4.0.0.xsd">
<modelVersion>4.0.0</modelVersion>
<groupId>digital.pegus.blog.examples</groupId>
<artifactId>asciidoctor-custom-pdf</artifactId>
<version>0.0.1-SNAPSHOT</version>
<name>asciidoctor-custom-pdfemo</name>
<description>Demo project that shows how to customize the PDF output of Asciidoctor</description>
<properties>
<project.build.sourceEncoding>UTF-8</project.build.sourceEncoding>
<java.version>11</java.version>
<asciidoctor-maven-plugin.version>1.6.0</asciidoctor-maven-plugin.version>
</properties>
<build>
<plugins>
<plugin>
<groupId>org.asciidoctor</groupId>
<artifactId>asciidoctor-maven-plugin</artifactId>
<version>${asciidoctor-maven-plugin.version}</version>
<dependencies>
<dependency>
<groupId>org.asciidoctor</groupId>
<artifactId>asciidoctorj-pdf</artifactId>
<version>1.5.0-beta.5</version>
</dependency>
</dependencies>
<executions>
<execution>
<id>generate-docs-pdf</id>
<phase>prepare-package</phase>
<goals>
<goal>process-asciidoc</goal>
</goals>
<configuration>
<backend>pdf</backend>
</configuration>
</execution>
</executions>
</plugin>
</plugins>
</build>
</project>Next to that, create a Documentation.adoc file in the src/main/asciidoc directory as that is the default directory where asciidoctor-maven-plugin will look for source files. Fill it up with some content you have, or just add some dummy content.
Now run mvn package and a Documentation.pdf should get generated at target/generated-docs. In my example, this was my asciidoc source:
= Example Documentation
:icons: font
:toc:
:toclevels: 3
:numbered:
== This is a chapter in the documentation
There is some content here
=== This is a sub-chapter
Some dummy content
== This is another chapterWhich generated this PDF:
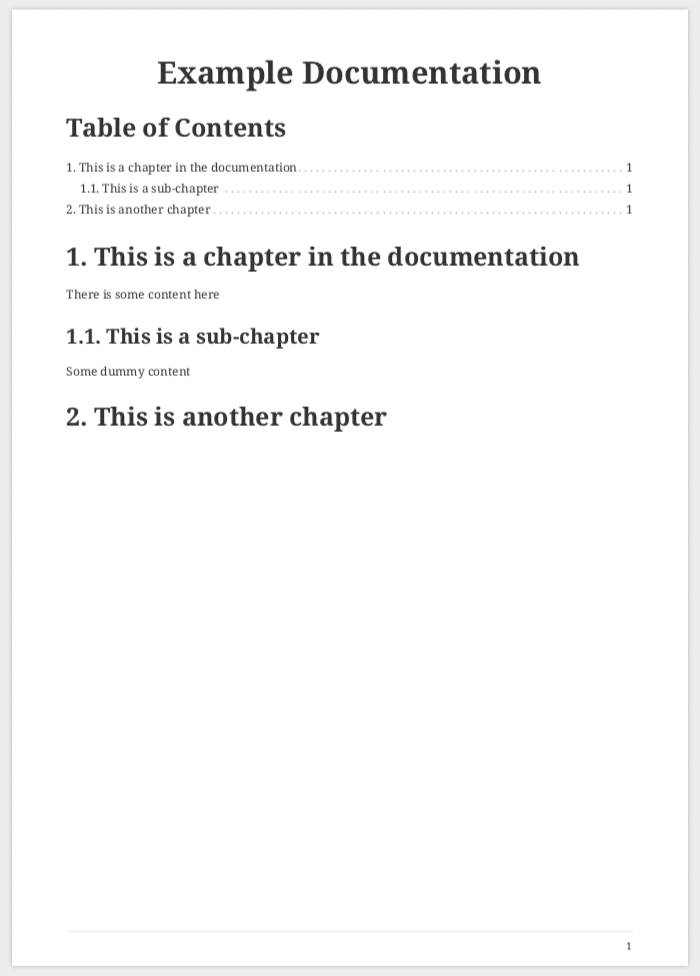
This is not too bad, but there are some customizations we would like to apply:
-
Make it more like a book with a title page and a separate table of contents
-
Change the footer to include the name of the current chapter next to the page number
-
Add a header with a logo and the document title
-
Change the font
Making it a book
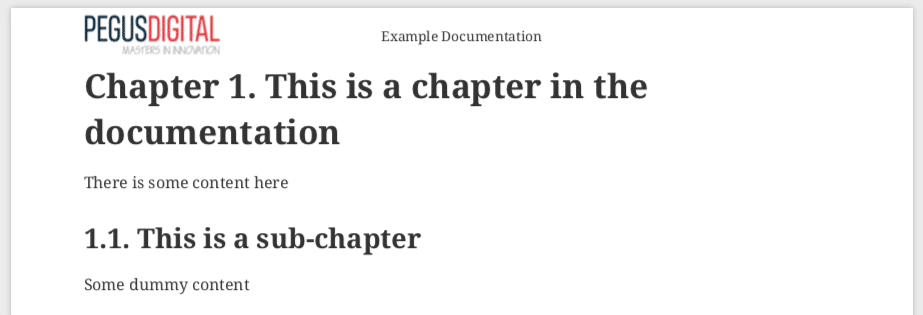
Asciidoctor has the concept of documentation types which can be article, book, inline or manpage. By default, article is used, but we want to change this to book. There are 2 ways to do this:
-
Add the
:doctype: bookdeclaration at the start of the document -
Add
<doctype>book</doctype>in the<configuration/>section of theasciidoctor-maven-plugin
Just choose one of the methods, no need to apply both ways. Regenerate the PDF output and you’ll notice that there is now a title page, a TOC starting on a new page, and each chapter also starting on a new page.
Change the footer
Maven configuration
We will first setup a custom theme for the PDF export in order to do our customizations. Start with creating a new configuration file src/main/asciidoc/theme/pegus-digital-theme.yml. The name of the config file can be anything you want, but it should end with -theme.
To have the asciidoctor-maven-plugin use the theme, we need to configure 2 attributes in the pom.xml:
<configuration>
<doctype>book</doctype>
<backend>pdf</backend>
<attributes>
  <pdf-stylesdir>${project.basedir}/src/main/asciidoc/theme</pdf-stylesdir>
  <pdf-style>pegus-digital</pdf-style>
</attributes>
</configuration>Note that the <pdf-style> attribute is using the name of the YAML configuration file without the -theme part.
Theme configuration
If wanted, the theme file can contain a complete new styling for the PDF export, but in this case, we just want to do some customizations on top of the default theme. To do this, just add the following in the YAML file:
extends: defaultWith this, our style will be based of the default PDF output style. It can be viewed at https://github.com/asciidoctor/asciidoctor-pdf/blob/master/data/themes/default-theme.yml. It is extremely useful to investigate that file in order to figure out how to customize the PDF export.
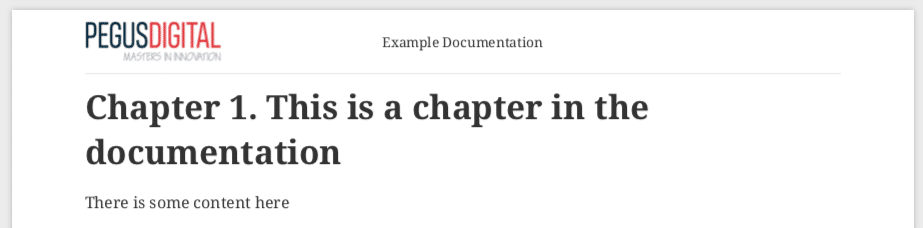
In order to have our chapter title in the footer, we need to use this YAML configuration:
extends: default
footer:
  recto:
    right:
      content: '{chapter-title} | *{page-number}*'
This can be explained as follows:
-
footer: we want to change the footer here. There is also aheaderkey. -
recto: we want to change the so called "recto" pages, which in a book is normally the right page if you have the book open. There is also aversokey for the other (left) pages of the book. -
right: the footer is divided in 3 parts, we can add contentleft,centerorright -
{chapter-title}and{page-number}are Asciidoc attributes that are available in the content of a footer. See the Theming Guide for other attributes that are available.
Run mvn package again and the resulting PDF will have our updated footer:

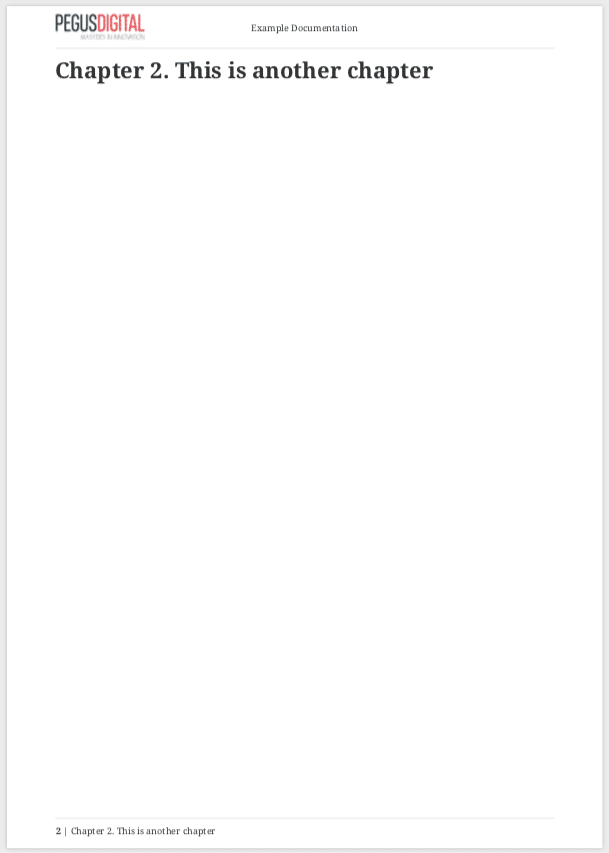
You’ll notice that only page 1 has the footer. Page 2 has just the page number as this is the default. If we want the same on page 2, we need to define the verso:
extends: default
footer:
  recto:
    right:
      content: '{chapter-title} | *{page-number}*'
  verso:
    left:
      content: '*{page-number}* | {chapter-title}'
Note how we use left on the verso side and we inverted the order of the content so the page number is always on the "outside":

Customize the header
For the header, we want to have our logo in the top left corner and the title of the document in the center. To get started, we put our logo in the src/main/asciidoc/theme folder. In our example, it is called pegus-digital-logo.png. Add this to the pegus-digital-theme.yml file:
header:
  height: $base_line_height_length * 3
recto:
  left:
    content: image:pegus-digital-logo.png[width=120]
  center:
    content: '{document-title}'
What we have in the configuration is:
-
height: set the height of the header. By default, the header is limited in height and not enough to display the logo. -
imagedeclaration in theleft/contentsection. We can tweak the size of the image with thewidthdeclaration on the image. -
{document-title}in thecenterof the header
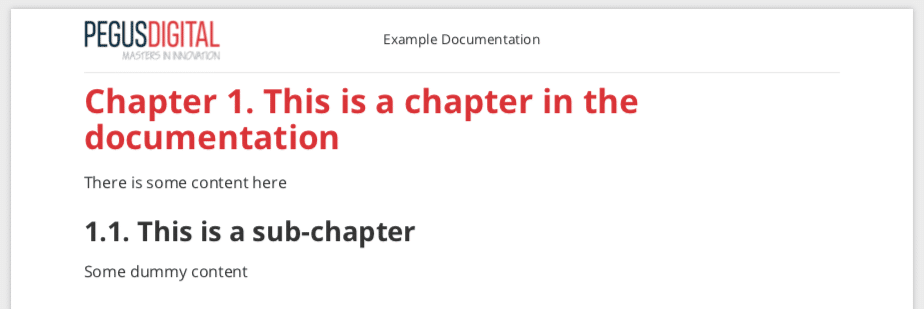
The resulting PDF looks like this:
So we have the content in the header we want, but the styling could be a bit better. We will add a small line beneath the header to offset it from the main content and adjust the page margins so the content is not so close to the header as it is now:
page:
  margin: [0.7in, 0.67in, 0.67in, 0.67in]
header:
  height: $base_line_height_length * 3.5
  border_color: dddddd
  border_width: 0.25
recto:
  left:
    content: image:pegus-digital-logo.png[width=120]
  center:
    content: '{document-title}'
We are using inches for the margins because the default stylesheet also uses inches, but there are different measurement units that you can use. The resulting PDF:
Again, we only have this on the recto pages since we defined it like that. If we want the verso pages to be exactly the same, we can refer to what we have on the recto side in the verso configuration:
header:
  height: $base_line_height_length * 3.5
  border_color: dddddd
  border_width: 0.25
recto:
  left:
    content: image:pegus-digital-logo.png[width=120]
  center:
    content: '{document-title}'
verso:
  left:
    content: $header_recto_left_content
  center:
    content: $header_recto_center_content
Any key in the YAML configuration can be referenced with $path_to_the_key. In our example, it allows us to define the content for the header in 1 place.
With this, we have our header on the verso side as well:
Custom font
The Theming Guide goes into great detail on how to use custom fonts with the PDF export. To be absolutely sure your font will work in all conditions, you need to prepare the font. However, we just took a font from Google fonts and things just worked.
For our example, we will use Open Sans, a modern looking sans serif font. To get started, download the font and copy these 4 variants to src/main/asciidoc/fonts while renaming them:
-
OpenSans-Regular.ttf→opensans-normal.ttf -
OpenSans-Italic.ttf→opensans-italic.ttf -
OpenSans-Bold.ttf→opensans-bold.ttf -
OpenSans-BoldItalic.ttf→opensans-bold_italic.ttf
Configure pdf-fontsdir so the Maven plugin knows where to find the fonts:
<configuration>
    <doctype>book</doctype>
    <backend>pdf</backend>
    <attributes>
        <pdf-stylesdir>${project.basedir}/src/main/asciidoc/theme</pdf-stylesdir>
        <pdf-style>pegus-digital</pdf-style>
        <pdf-fontsdir>${project.basedir}/src/main/asciidoc/fonts</pdf-fontsdir>
    </attributes>
</configuration>
Next, configure the fonts in the theme:
font:
  catalog:
    Noto Serif:
      normal: GEM_FONTS_DIR/notoserif-regular-subset.ttf
      bold: GEM_FONTS_DIR/notoserif-bold-subset.ttf
      italic: GEM_FONTS_DIR/notoserif-italic-subset.ttf
      bold_italic: GEM_FONTS_DIR/notoserif-bold_italic-subset.ttf
    # M+ 1mn supports ASCII and the circled numbers used for conums
    M+ 1mn:
      normal: GEM_FONTS_DIR/mplus1mn-regular-subset.ttf
      bold: GEM_FONTS_DIR/mplus1mn-bold-subset.ttf
      italic: GEM_FONTS_DIR/mplus1mn-italic-subset.ttf
      bold_italic: GEM_FONTS_DIR/mplus1mn-bold_italic-subset.ttf
    OpenSans:
      normal: opensans-normal.ttf
      italic: opensans-italic.ttf
      bold: opensans-bold.ttf
      bold_italic: opensans-bold_italic.ttf
Note that we need to declare the original fonts as well in the font catalog!
Finally, use the declared font:
base:
  font_family: OpenSans
heading:
  font-family: OpenSans
h2:
  font-color: '#da3131'
literal:
  font_color: '#da3131'
This results in a PDF with the OpenSans font used:
We are here using OpenSans for the base content and the headings, but using the same mechanism, you can have different fonts for headings and content.