In TodoMVC with Spring Boot and Thymeleaf, we implemented a TodoMVC clone using Spring MVC and Thymeleaf. In such a setup, each action triggers a page refresh. While this works just fine, you might want to give a more Single Page Application (SPA) spice to the experience and avoid page refreshes. This blog post will show how to use HTMX to accomplish this.
What is HTMX?
HTMX is a JavaScript library that allows to trigger AJAX calls directly in HTML by adding attributes on HTML elements.
A very simple example, straight from their homepage:
<button hx-post="/clicked" hx-swap="outerHTML">
    Click Me
</button>
When the button is clicked, a HTTP POST is done on /clicked and the response will replace the <button> element in the DOM with the HTML response of that call.
So, with HTMX, you are not building a JSON API, but an API that returns HTML fragments.
You can find some nice examples of what HTMX can do on the website: https://htmx.org/examples/
We will start from the final code at todomvc-thymeleaf and gradually add functionality using HTMX.
Add HTMX to the project
Add htmx to the Spring Boot project, by adding the webjars Maven dependency:
<dependency>
    <groupId>org.webjars.npm</groupId>
    <artifactId>htmx.org</artifactId>
    <version>1.6.0</version>
</dependency>
In the index.html, add the reference to the library:
<script type="text/javascript" th:src="@{/webjars/htmx.org/dist/htmx.min.js}"></script>HTMX boosting
One of the easiest ways to get started is "boosting" regular HTML anchors and forms using hx-boost.
We can add hx-boost to the top-level element of our page, and HTMX will intercept the form submits, turn them into AJAX requests and use the response HTML to dynamically change the current page without a page refresh.
There is no need to change anything on the server side, the redirects can just stay in place.
HTMX will handle them properly.
The only thing we need to do is replace this:
<section class="todoapp">with:
<section class="todoapp" hx-boost="true">There is one additional change that needs to happen for the JavaScript that triggers the form submit when the checkbox is checked to toggle the completion state of the todo item.
We need to replace onchange="this.form.submit()" with onchange="this.form.requestSubmit()":
<input th:id="|toggle-checkbox-${item.id}|"
        class="toggle" type="checkbox"
       onchange="this.form.requestSubmit()"
       th:attrappend="checked=${item.completed?'true':null}">
Otherwise, HTMX can’t intercept the form submit.
Restart the application and notice how the browser never reloads the page, everything seems to happen as if this was a complete JavaScript built application.
The filters at the bottom that filter on all items, active items and completed items also work fine. HTMX will also update the URL in the browser to reflect that path that the browser would normally redirect to.
Finegrained HTMX implementation
While using hx-boost works fine, you might want to have more control over what is sent over the wire. For example, when a new todo item is created, you can just return the HTML of that new todo item, and not the complete page.
Let’s see how this works.
|
If you follow along, remove the |
Adding a todo item
To add an item, SPA-style, we will add some htmx attributes to our HTML. This is what we have currently:
<form th:action="@{/}" method="post" th:object="${item}">
    <input class="new-todo" placeholder="What needs to be done?" autofocus
           th:field="*{title}">
</form>
This is what it needs to change to:
<form id="new-todo-form" th:action="@{/}" method="post" th:object="${item}">
    <input id="new-todo-input" class="new-todo" placeholder="What needs to be done?" autofocus
           autocomplete="false"
           name="title"
           th:field="*{title}"
           hx-target="#todo-list"
           hx-swap="beforeend"
           hx-post="/"
           hx-trigger="keyup[key=='Enter']"
    >
</form>
The 4 hx-… elements explained:
-
hx-trigger: htmx will do the request when the enter key is pressed. -
hx-post: htmx will do a POST request to/ -
hx-target: The HTML response of the POST request should be added to the HTML element with idtodo-listthat is present on the page. -
hx-swap: The HTML response must be added just before the end of the HTML element that is targetted.
We can’t use our default controller method as that one redirects after the POST. We need a new one that returns the HTML snippet we need to render a single todo item.
For that purpose, we add this new method in our Spring MVC controller:
@PostMapping(headers = "HX-Request") (1)
public String htmxAddTodoItem(TodoItemFormData formData,
                              Model model) {
    TodoItem item = repository.save(new TodoItem(formData.getTitle(), false)); (2)
    model.addAttribute("item", toDto(item)); (3)

    return "fragments :: todoItem"; (4)
}| 1 | We want this method to react to a POST on /, but only when the HX-Request header is set (Something that htmx adds to all requests). |
| 2 | Do the actual work of saving the todo item in the database. |
| 3 | Add the item converted to the DTO in the model so Thymeleaf can use it to render the template. |
| 4 | Ask Thymeleaf to render the todoItem fragment from fragments.html |
Point 4 here is especially important.
We already used a Thymeleaf fragment to have a nice structure in our index.html template:
<ul id="todo-list" class="todo-list" th:remove="all-but-first">
  <li th:insert="fragments :: todoItem(${item})" th:each="item : ${todos}" th:remove="tag">
  </li>
</ul>
The very nice thing is that we now can re-use this fragment to return the HTML that is needed to render a single todo item as HTML by returning fragments :: todoItem from the controller method.
If you are following along, you also need to make the following edits to make it fully work:
-
Add the
id="todo-list"to the<ul>element that holds the todo items since that is the target of our htmx call. -
Ensure the main section is present, but hidden in the HTML. Replace:
<section class="main" th:if="${totalNumberOfItems > 0}">with
<section id="main-section" class="main" th:classappend="${totalNumberOfItems == 0?'hidden':''}"> -
Same thing for the footer:
<footer class="footer" th:if="${totalNumberOfItems > 0}">becomes:
<footer id="main-footer" class="footer" th:classappend="${totalNumberOfItems == 0?'hidden':''}"> -
Because the input field is now no longer reset, as there is no page refresh, we need to add a bit of JavaScript to clear the input:
<script>
    htmx.on('#new-todo-input', 'htmx:afterRequest', function (evt) { (1)
        evt.detail.elt.value = ''; (2)
    });
</script>
1 Register a callback function that is triggered after each request that happens on the new-todo-inputitem.2 Set the value to the empty string on the element that triggered the callback, effectively clearing out the text input. -
To avoid that the form submission still happens as we also still have that form in place, we can disable it from JavaScript:
<script>
    document.getElementById('new-todo-form').addEventListener('submit', function (evt) {
        evt.preventDefault();
    })
</script>
This is entirely optional. We could have removed the
<form>element completely and it would also still work. But with this setup, the form is used when JavaScript is disabled. And htmx is used when JavaScript is enabled.It is also possible to add the
hx-…attributes on the<form>itself like this:<form id="new-todo-form" th:action="@{/}" method="post" th:object="${item}" hx-target="#todo-list" hx-swap="beforeend" hx-post="/"> <input id="new-todo-input" class="new-todo" placeholder="What needs to be done?" autofocus autocomplete="false" name="title" th:field="*{title}" > </form>In that case, HTMX will disable the form submission and we don’t have to do it in JavaScript manually.
When the first todo item is added, the main section and the main footer should become visible. We can implement this by adding this bit of custom JavaScript:
<script>
    htmx.on('htmx:afterSwap', function (evt) { (1)
        let items = document.querySelectorAll('#todo-list li'); (2)
        let mainSection = document.getElementById('main-section');
        let mainFooter = document.getElementById('main-footer');

        if (items.length > 0) { (3)
            mainSection.classList.remove('hidden');
            mainFooter.classList.remove('hidden');
        } else {
            mainSection.classList.add('hidden');
            mainFooter.classList.add('hidden');
        }
    });
</script>| 1 | Define a callback function that is called each time htmx does a swap in the DOM tree. |
| 2 | Count the number of <li> items in the todo-list element |
| 3 | Check if there are todo items or not to add or remove the hidden CSS class. |
An alternative implemention would be to target a bigger part of the HTML and return not only the HTML for the todo item itself, but also include the full main section and footer.
I found this approach here to be nicer, as the HTML snippet returned from the controller method only contains the <li> that renders the todo item itself.
Even if I had to write this small snippet of JavaScript to make it work.
Explanation of how it works at runtime
To explain things in more detail, this is how it works at runtime.
When the page loads the first time, Thymeleaf renders the template and the HTML looks like this:
<form id="new-todo-form" action="/" method="post">
    <input id="new-todo-input" class="new-todo" placeholder="What needs to be done?" autofocus="" autocomplete="false"
           name="title"
           hx-target="#todo-list"
           hx-swap="beforeend"
           hx-post="/"
           hx-trigger="keyup[key=='Enter']"
           value="">
</form>

<ul id="todo-list" class="todo-list">
</ul>
We can now add a new item by typing some text in the input and pressing ENTER. When this is done, htmx sends the POST request and swaps in the returned HTML.
We can see this in the developer tools:
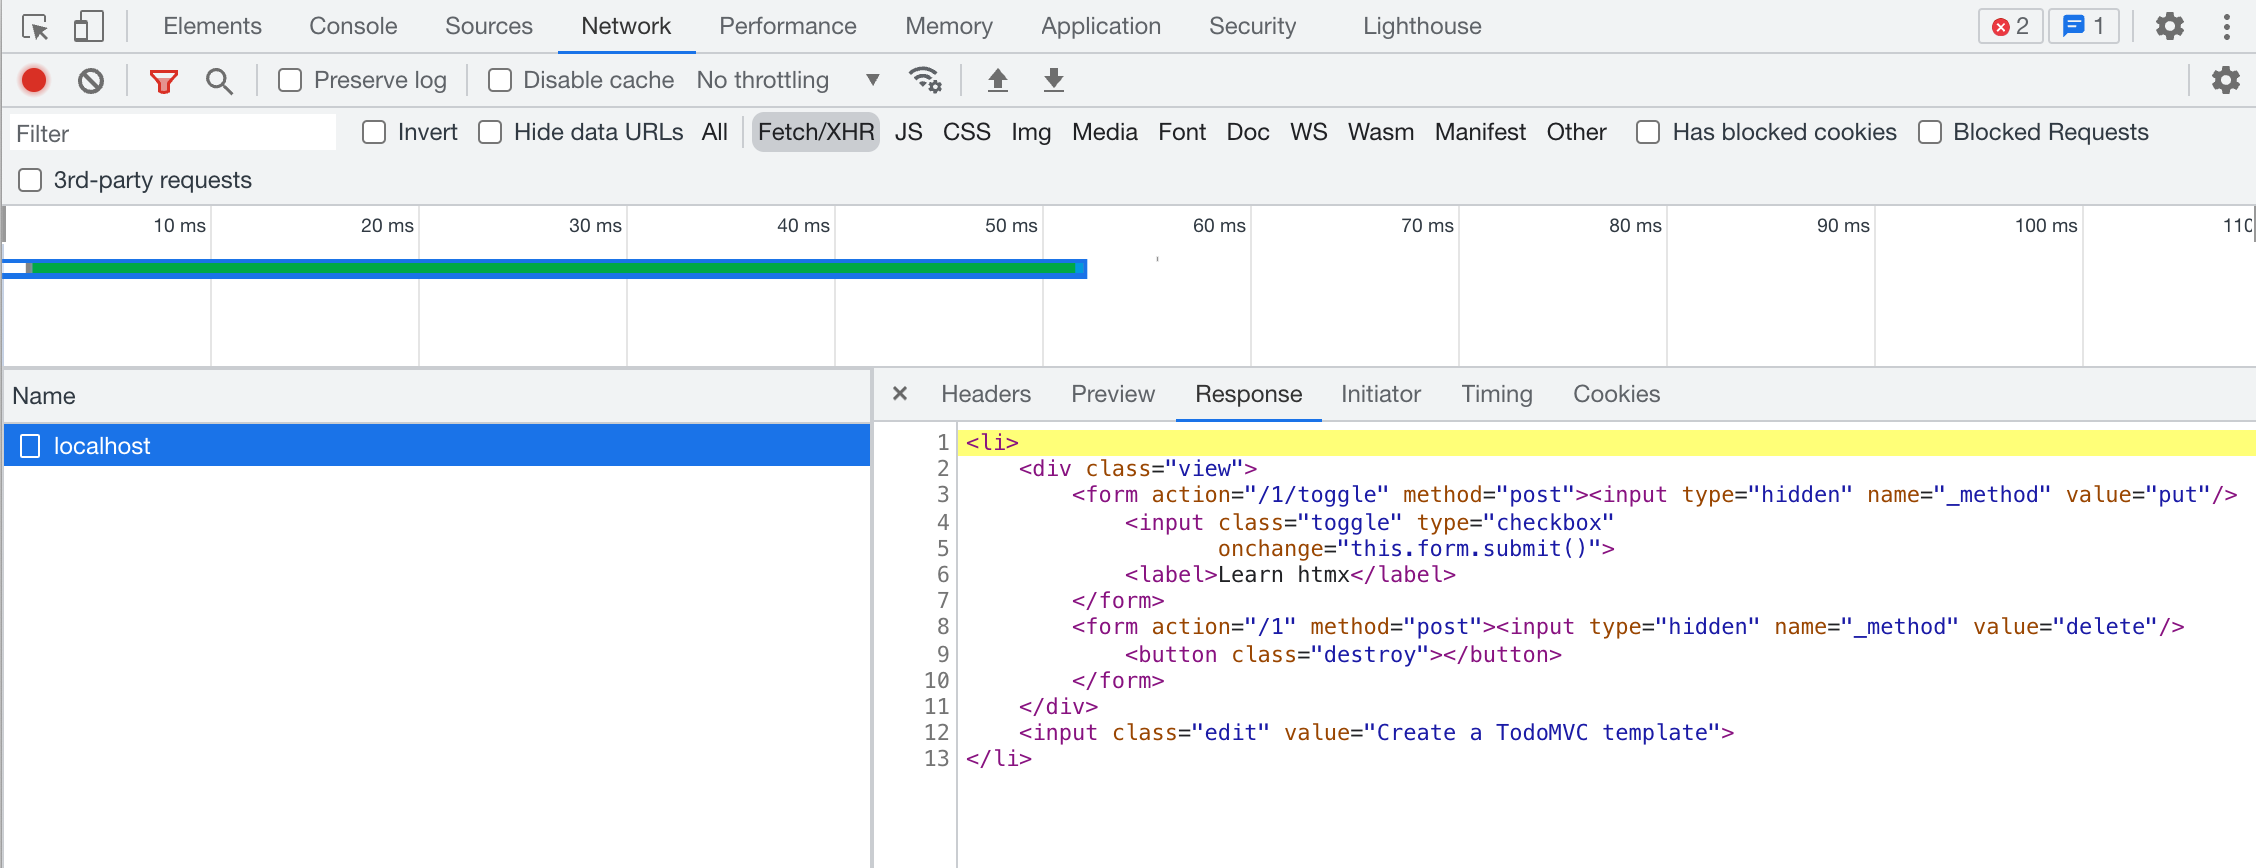
It shows the POST request with the HTML snippet as the response.
HTMX takes that response and swaps it into the HTML that is already present in the browser to create this SPA-like experience for the end-user.
The result is that the todo item is added without a page refresh. The resulting HTML is:
<ul id="todo-list" class="todo-list">
    <li> (1)
        <div class="view">
            <form action="/1/toggle" method="post"><input type="hidden" name="_method" value="put">
                <input class="toggle" type="checkbox" onchange="this.form.submit()">
                <label>Learn htmx</label>
            </form>
            <form action="/1" method="post"><input type="hidden" name="_method" value="delete">
                <button class="destroy"></button>
            </form>
        </div>
        <input class="edit" value="Create a TodoMVC template">
    </li>
</ul>| 1 | The HTML snippet that is returned from the POST is added by htmx inside the todo-list element. |
When the new HTML is swapped into the DOM, the JavaScript callback is trigger to make the main-section and main-footer elements visible.
The application looks like this after adding the first todo item:
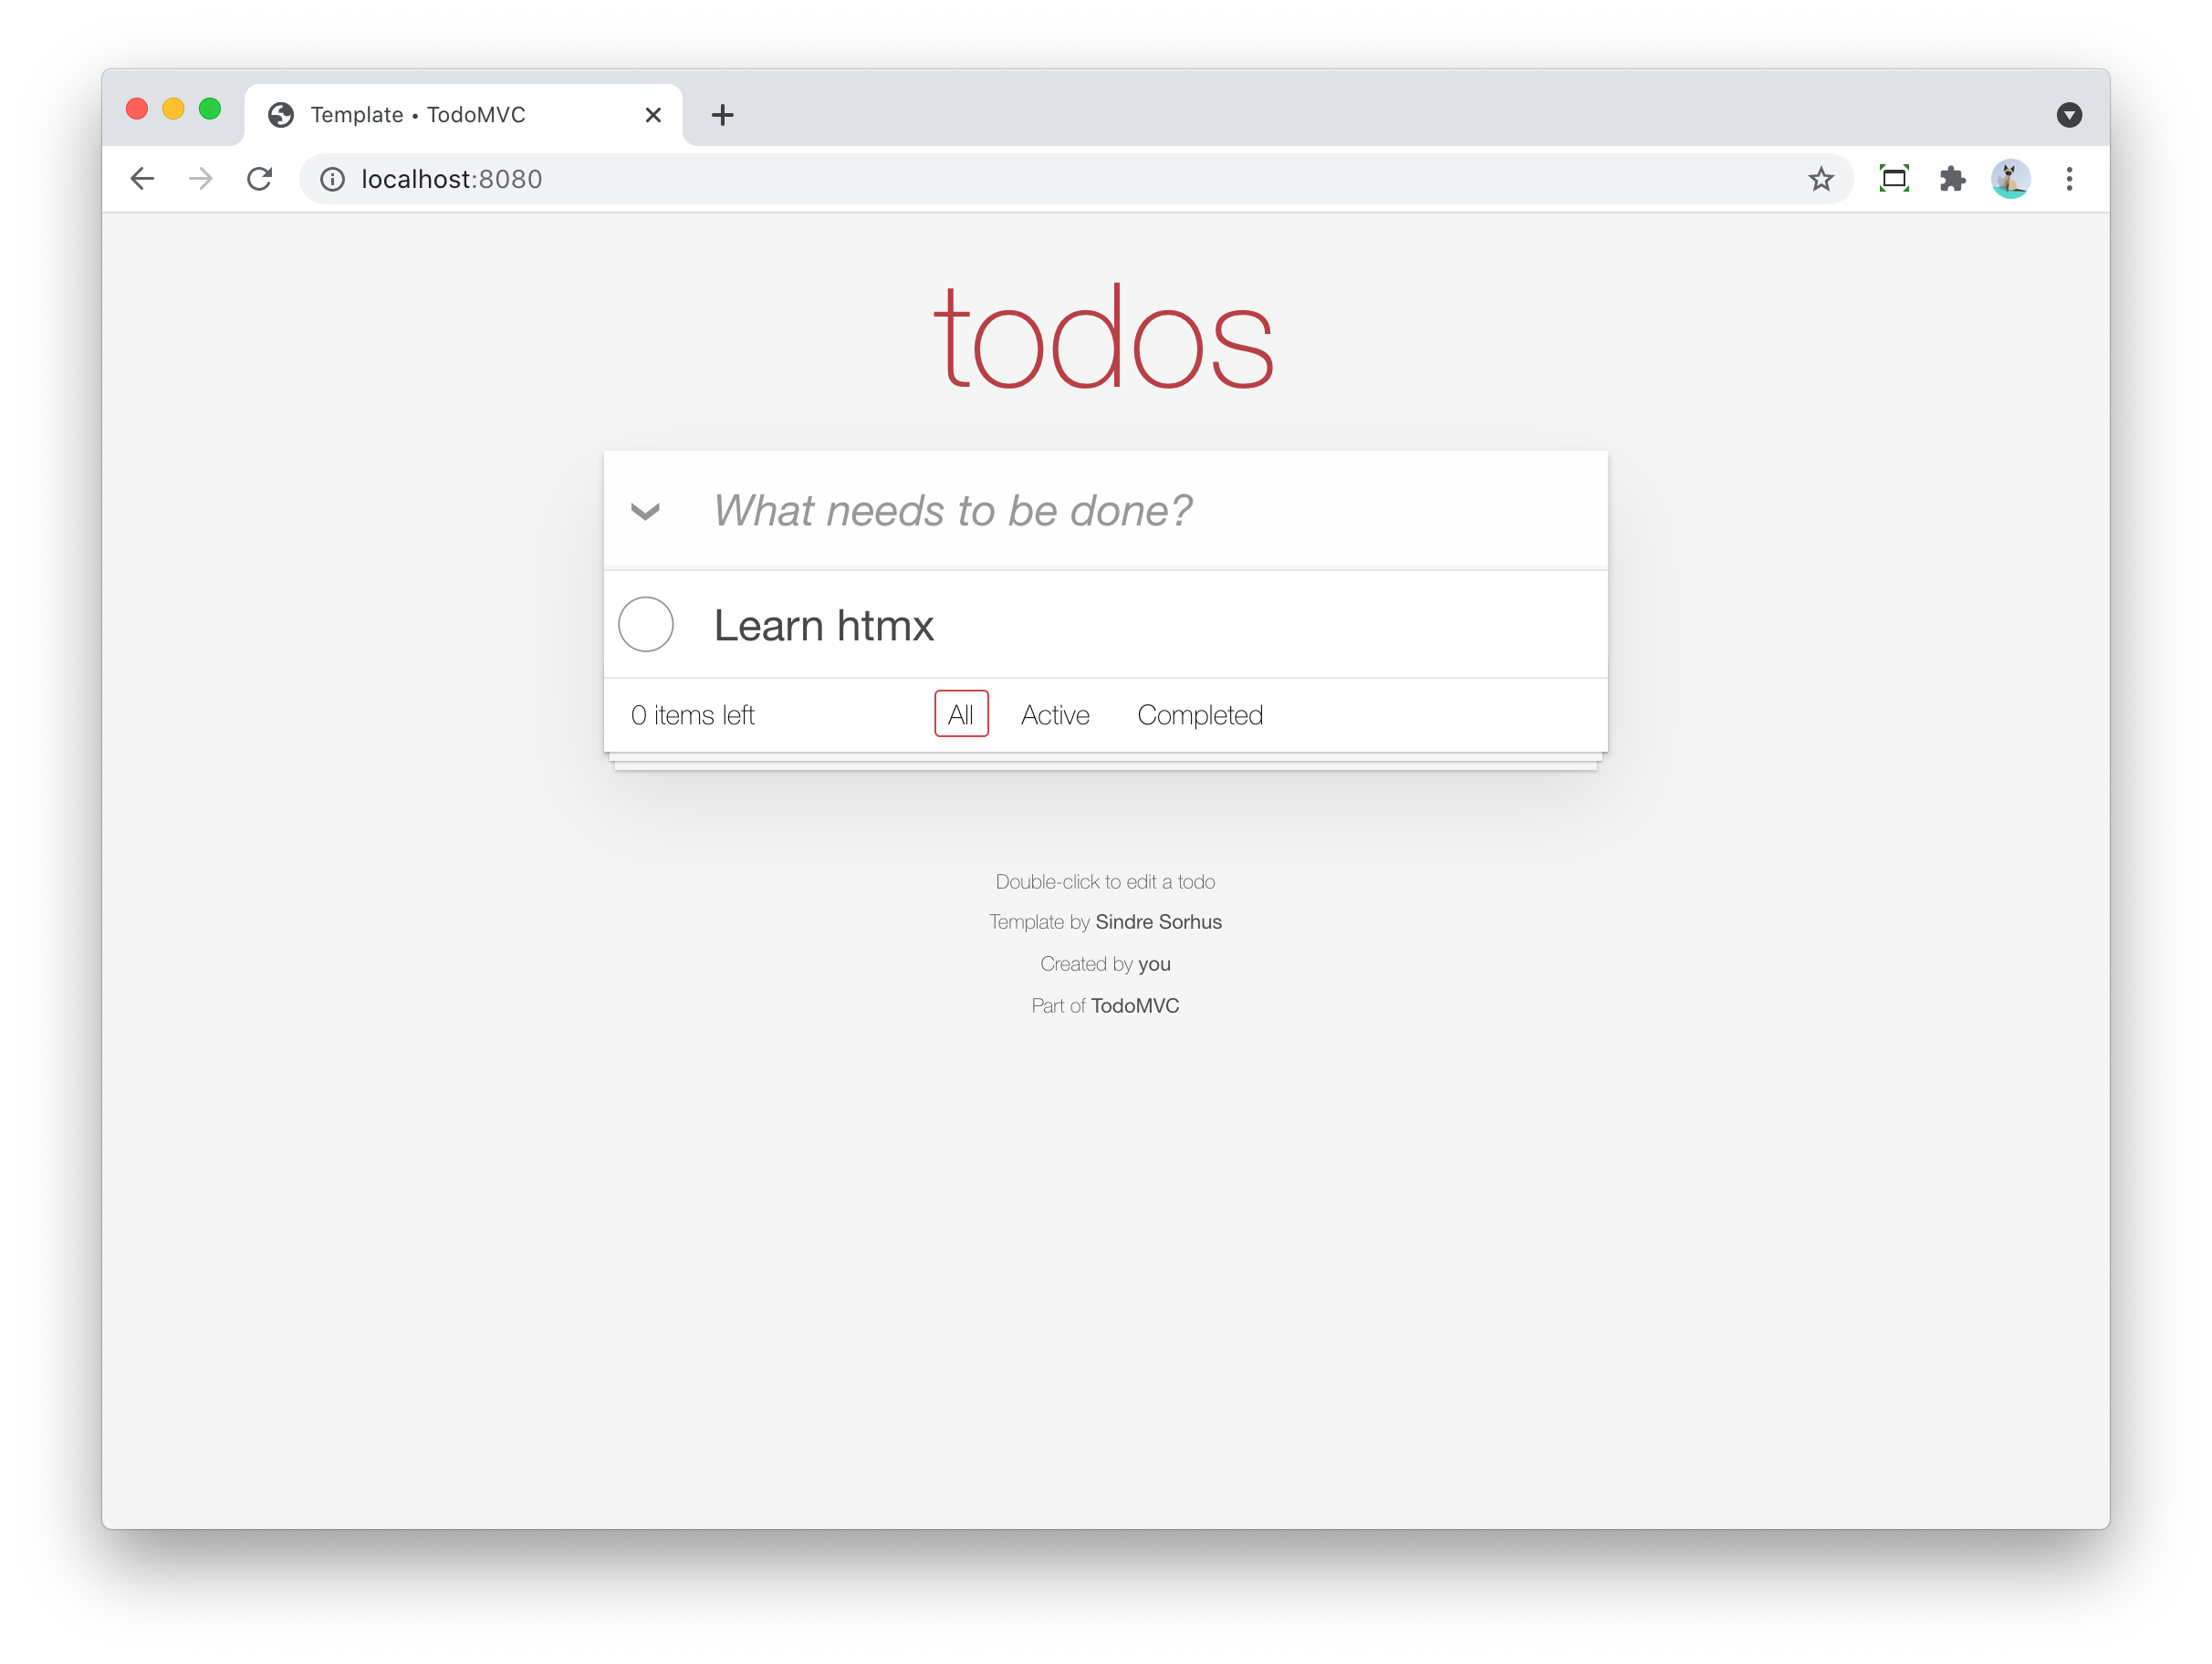
If you try this out, you’ll notice that there is no page refresh. You can also try disabling JavaScript and it should still work (but with page refresh of course).
Update number of items
We can now add items in our todo list via htmx, without any page refresh, but the number of active items in the footer does not get updated.
To make this work again, we can use events in htmx.
Start by extracting the HTML that shows the number of active items into a Thymeleaf fragment:
<span th:fragment="active-items-count"
      id="active-items-count"
      class="todo-count"
      hx-get="/active-items-count"
      hx-swap="outerHTML"
      hx-trigger="itemAdded from:body">
        <th:block th:unless="${numberOfActiveItems == 1}">
            <span class="todo-count"><strong th:text="${numberOfActiveItems}">0</strong> items left</span>
        </th:block>
        <th:block th:if="${numberOfActiveItems == 1}">
            <span class="todo-count"><strong>1</strong> item left</span>
        </th:block>
</span>
Note that we added 3 htmx attributes:
-
hx-get: instruct htmx to do a HTTP GET on/active-items-count -
hx-swap: instruct htmx to replace the complete span with what we get back from the GET request. -
hx-trigger: trigger the HTTP GET when there is an eventitemAddedcoming from any element that is a child element of<body>.
So whenever there is an itemAdded sent somewhere, these 2 attributes will ensure that there will be an automatic GET request to update the number of items.
The response of the GET returns the HTML snippet that will be used to replace itself in the DOM.
We want the event to be sent when a new item is added.
We do this by adding a special header HX-Trigger in the response:
    @PostMapping(headers = "HX-Request")
    public String htmxAddTodoItem(TodoItemFormData formData,
                                  Model model,
                                  HttpServletResponse response) { (1)
        TodoItem item = repository.save(new TodoItem(formData.getTitle(), false));
        model.addAttribute("item", toDto(item));

        response.setHeader("HX-Trigger", "itemAdded"); (2)
        return "fragments :: todoItem";
}| 1 | Inject HttpServletResponse to be able to add a custom header |
| 2 | Added itemAdded as the value of the HX-Trigger response header |
By returning the header, htmx will trigger the itemAdded event, which is caught by out little fragment and it will update the number of active items.
Finally, use the fragment in the index.html page:
<footer id="main-footer" class="footer" th:classappend="${totalNumberOfItems == 0?'hidden':''}">
  <span th:replace="fragments :: active-items-count"></span>
  ...
With this in place, the number of active items is updated properly whenever a new item is added without page refresh.
Mark item as completed
We can continue to make our application more interactive (less page reloads) by implementing toggling the completion state of an item with HTMX.
Start by adding a new controller method:
    @PutMapping(value = "/{id}/toggle", headers = "HX-Request") (1)
    public String htmxToggleTodoItem(@PathVariable("id") Long id,
                                     Model model,
                                     HttpServletResponse response) {
        TodoItem todoItem = repository.findById(id)
                                      .orElseThrow(() -> new TodoItemNotFoundException(id));

        todoItem.setCompleted(!todoItem.isCompleted());
        repository.save(todoItem);

        model.addAttribute("item", toDto(todoItem)); (2)

        response.setHeader("HX-Trigger", "itemCompletionToggled"); (3)
        return "fragments :: todoItem"; (4)
}| 1 | The HX-Request header ensures this method is only called for requests done by HTMX. |
| 2 | After toggling the todo item, add the DTO to the Model so the fragment can render properly with the information from the DTO. |
| 3 | Send a response header back so that other parts of the page can react to the toggling of the item. In this case, we will have the label that shows the number of active items update. |
| 4 | Use the Thymeleaf fragment to send the HTML snippet back to the browser. |
On the HTML side, we will replace this:
<li th:fragment="todoItem(item)" th:classappend="${item.completed?'completed':''}">
    <div class="view">
        <form th:action="@{/{id}/toggle(id=${item.id})}" th:method="put">
            <input class="toggle" type="checkbox"
                   onchange="this.form.submit()"
                   th:attrappend="checked=${item.completed?'true':null}">
            <label th:text="${item.title}">Taste JavaScript</label>
        </form>
        <form th:action="@{/{id}(id=${item.id})}" th:method="delete">
            <button class="destroy"></button>
        </form>
    </div>
    <input class="edit" value="Create a TodoMVC template">
</li>
with:
<li th:fragment="todoItem(item)" th:classappend="${item.completed?'completed':''}" th:id="|list-item-${item.id}|">
    <div class="view">
        <input th:id="|toggle-checkbox-${item.id}|" class="toggle" type="checkbox"
               th:attrappend="checked=${item.completed?'true':null}"
               th:attr="hx-put=@{/{id}/toggle(id=${item.id})},hx-target=|#list-item-${item.id}|"
               hx-trigger="click"
               hx-swap="outerHTML"
        >
        <label th:text="${item.title}">Taste JavaScript</label>
        <form th:action="@{/{id}(id=${item.id})}" th:method="delete">
            <button class="destroy"></button>
        </form>
    </div>
    <input class="edit" value="Create a TodoMVC template">
</li>
These are the changes in detail:
-
Remove the
<form>around the<input>as we will use HTMX now and no longer a form submit. -
An
idis added on the<li>item. This is needed as HTMX will replace the complete<li>item with an updated one that it will receive as a response to the AJAX call. HTMX needs theidto be able to know which<li>it needs to replace. -
Add the
hx-trigger="click"attribute so HTMX will start to do its work when the<input>item is clicked. -
Add the
hx-swap="outerHTML"attribute so HTMX will replace the current<li>completely with the received<li>snippet in the AJAX response. By default, HTMX usesinnerHTMLwhich would make the response a child element of the target element. -
Add
hx-put=…so that a PUT request is done. We need to useth:attrso we can use theitemparameter of the Thymeleaf fragment to dynamically build the correct URL to use. -
Add
hx-target=…to point to the id of the<li>element. This instructs HTMX to use that element as the target for replacement.
This already works to toggle the completed state of individual todo item. However, the number of active items does not get updated yet. This is because we only trigger a new request to get the current number of active items after an item is added:
<span th:fragment="active-items-count"
      id="active-items-count"
      class="todo-count"
      hx-get="/active-items-count"
      hx-trigger="itemAdded from:body">
        <th:block th:unless="${numberOfActiveItems == 1}">
            <span class="todo-count"><strong th:text="${numberOfActiveItems}">0</strong> items left</span>
        </th:block>
        <th:block th:if="${numberOfActiveItems == 1}">
            <span class="todo-count"><strong>1</strong> item left</span>
        </th:block>
</span>
We need to update the hx-trigger attribute to also react to our new event itemCompletionToggled:
<span th:fragment="active-items-count"
      id="active-items-count"
      class="todo-count"
      hx-get="/active-items-count"
      hx-trigger="itemAdded from:body, itemCompletionToggled from:body">
    ...
</span>
With this in place, we can toggle the completion status of the todo items and the active count also gets updated. All without page refreshes.
Delete todo items
I’ll finish this blog post with one last example: implementation of delete of a todo item.
We again start with adding a new method to our controller:
    @DeleteMapping(value = "/{id}", headers = "HX-Request") (1)
    @ResponseBody (2)
    public String htmxDeleteTodoItem(@PathVariable("id") Long id,
                                     HttpServletResponse response) {
        repository.deleteById(id);

        response.setHeader("HX-Trigger", "itemDeleted"); (3)
        return ""; (4)
}| 1 | Ensure the method is used for HTMX requests via the HX-Request header. |
| 2 | We need to return an empty body as we want to replace the <li> item on the HTML page with nothing.
HTMX interprets an empty response as doing nothing, but a response with nothing is as having to basically delete the target item from the HTML, which is what we want here. |
| 3 | Have HTMX send out an itemDeleted event in the browser so we can update the number of active items. |
| 4 | Return an empty string (see point 2). |
On the HTML side, we replace:
<form th:action="@{/{id}(id=${item.id})}" th:method="delete">
    <button class="destroy"></button>
</form>
with:
<button class="destroy"
        th:attr="hx-delete=@{/{id}(id=${item.id})},hx-target=|#list-item-${item.id}|"
        hx-trigger="click"
        hx-swap="outerHTML"
></button>
This is very similar to what we did for toggling the item completation state.
The only difference is that we now use hx-delete and a slightly different URL.
To ensure the active items also update properly, we add another event to the hx-trigger there:
<span th:fragment="active-items-count"
      id="active-items-count"
      class="todo-count"
      hx-get="/active-items-count"
      hx-trigger="itemAdded from:body, itemCompletionToggled from:body, itemDeleted from:body">
    ...
</span>
Start the application again and enjoy the absence of page refreshes as you add items, toggle their completion status and remove them.
Conclusion
It is entire possible to have an interactive application that avoids page refreshes for certain actions using Spring Boot, Thymeleaf and HTMX.
Using hx-boost makes it dead easy, or if you want more control over what happens, this is also not that hard.
It does get some getting used to at the start.
The most important point to remember is that you return HTML snippets from your controller, not JSON.
And make sure the elements on your HTML have id attributes so HTMX can target them.
See todomvc-htmx-boost and todomvc-htmx on GitHub for the full sources.
If you have any questions or remarks, feel free to post a comment at GitHub discussions.